This list contains clarification of system behaviours and post-upgrade information relating to features in this release. Please take some time to review.
What difference will I see?
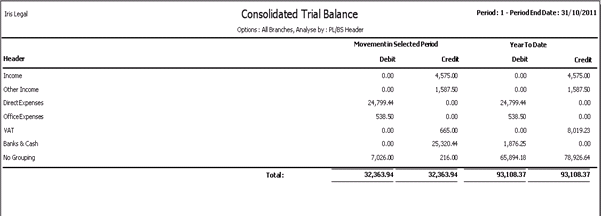
From Report Manager, in the Accounts / Management Accounts folder, there is a new report called Consolidated Trial Balance.
How do I take advantage of this change?
In order to provide the relevant level of analysis within the report, there are a number of changes to the Utilities / Accounts section.
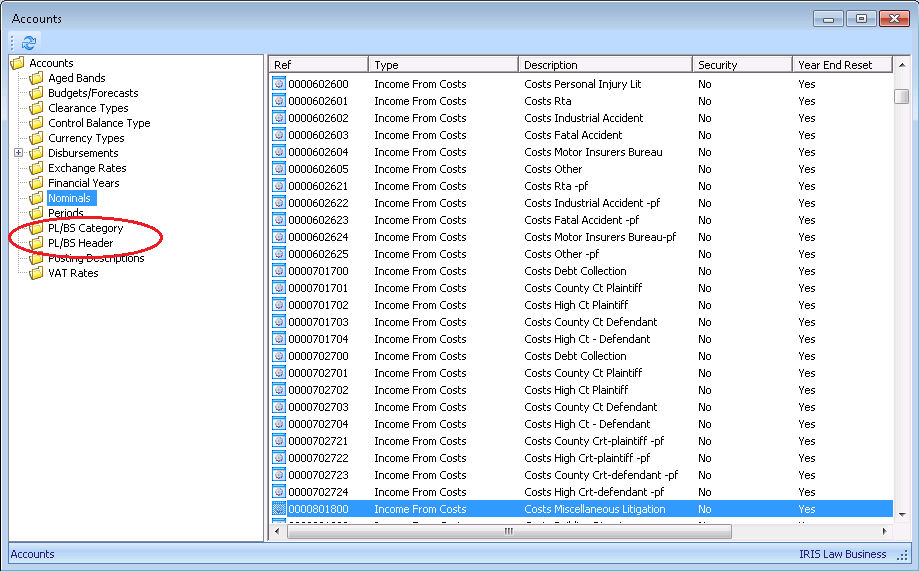
There are two new folders for PL/BS Categories and Headers. Nominals and the Office Bank can be linked to the Categories, which in turn are grouped under Headers to provide the multi-level analysis.
To create PL/BS Headers, select the PL/BS Header folder and right click in the right hand pane. Select Add PL/BS Header to display the following dialog box:
|
Field |
Description |
|
Ref |
Expects an integer value which allows you to order the headers within the report. |
|
Description |
Will appear as a label in the report. |
|
Direct Costs |
For the Profit & Loss report only. Can only have one header set as Direct Costs. |
To amend any details of a Header, right click and select Edit from the shortcut menu.
The shortcut menu also has a Delete option. However, if any categories, nominals or banks are using the header, you will get a warning message to say if you continue, they will be transferred to the "No Grouping" header.
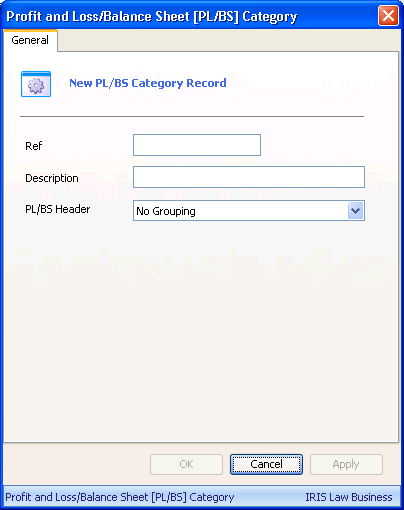
To create PL/BS Categories, select the PL/BS Category folder and right click in the right hand pane. Select Add PL/BS Category to get the following dialog box:
|
Field |
Description |
|
Ref |
Expects an integer value which allows you to order the categories within the report. |
|
Description |
Will appear as a label in the report. |
|
PL/BS Header |
Drop down to select which header this category is linked to. |
To amend any details of a category, right click on the category and select Edit.
When editing a category, you will also see an additional check box labelled Archived. If this is checked, this category will not be available for selection when assigning to a nominal.
The right click will also offer a Delete option. However, if there are any items linked to the category you will get a warning message to advise that if you continue, they will be transferred to the "No Grouping" category.
Once you have set up the PL/BS Headers and Categories, select the Nominal folder, right click on each nominal in turn and select Edit.
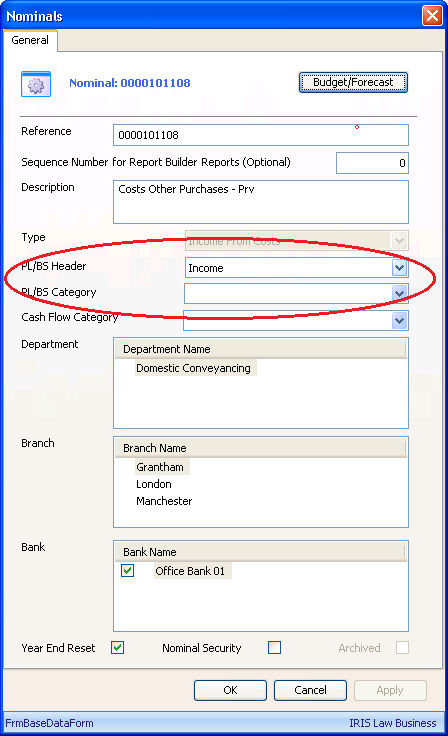
Use the relevant drop downs to apply PL/BS Headers and Categories to the nominals.
Note: Following the upgrade, the default setting for the PL/BS Headers and Categories will be "No Grouping", to make use of these analysis options, you will need to work through all the nominals assigning them to the relevant categories.
Note: There is a new field under the Reference field, "Sequence number for Report Builder Reports (Optional)". This has been set up for custom reports, produced by IRIS Professional Services consultants. It is an integer field, not mandatory, and can be left blank.
Currently bank accounts are grouped at the end of the report. As such, the fields for Sequence number, PL/BS Header and Category have been added so they can be included in headers and categories as required.
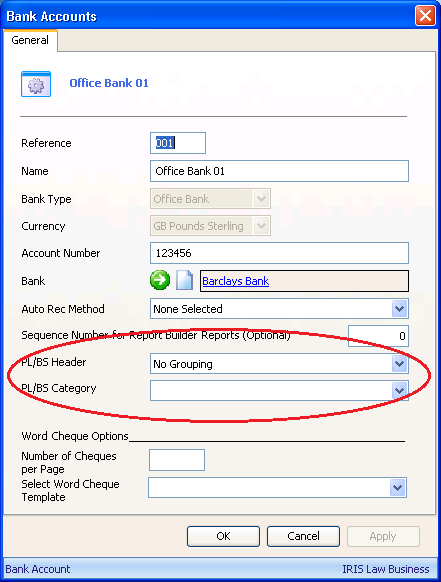
Note: The PL/BS Headers and Categories are currently only used for Office banks. Client and Deposit banks are not currently included in the Trial Balance.
To run the report, from Report Manager, expand the Accounts then Management Accounts folder and select Consolidated Trial Balance report.
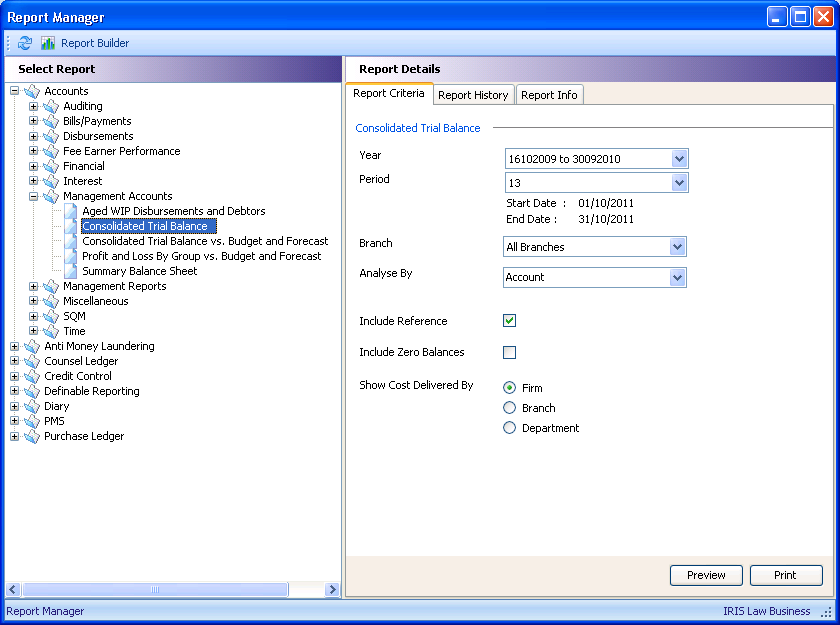
Selecting this report gives the following parameters in the right hand pane:
Year/Period, allows you to select the year and period for the report from the drop down lists. The values display the net sum of transactions within the selected period and year. The default values will be the current year and period.
Branch, allows you to select the report to run by All branches (consolidated) or by selected branch.
Analyse by, allows you to select to Analyse by Account, PL/BS Header or PL/BS Category.
Account will display values for every nominal account, excluding nominal types of "Income from Costs" (these items are displayed using the Show Costs Delivered option).
PL/BS Category will display values for every PL/BS Category with a subtotal of all nominal account values for each category, excluding nominal types of "Income from Costs" (these items are displayed using the Show Costs Delivered By option).
PL/BS Header will display values for every PL/BS Header with a subtotal of all nominal account values for each heading, excluding nominal types of "Income from Costs" (these items are displayed using the Show Costs Delivered By option).
Include Nominal Ledger Reference is only active if Account is selected for the analysis. If checked a column displaying the nominal ledger reference will be included on the report.
Include Zero Balances, if checked nominal accounts with a zero balance will be displayed in the columns, including last year's data. The default option is to not display zero balances, and there is a default to suppress rows in the report where there are zero balances in all columns.
Show Costs Delivered by (only available when the Analyse by Accounts is selected) will display the nominals of type "Income from Costs" by Firm, Branch or Department dependent on the radio button selected.
Administrators will need to give users access to the report, via Utilities / Licensing & Users / System Users, under the Features tab, in the Accounts / Access to Reports folder.
Note: This report uses new "header" fields which improve the performance of these reports. These fields are updated during the upgrade process and are updated automatically. However, if you suspect the figures are not correct, there is a utility that can be run to check the data. In the unlikely event of this happening, please call the Support Team on 0870 330 6688 and ask them to run the Check Data utility.
What benefit does this change bring to my business?
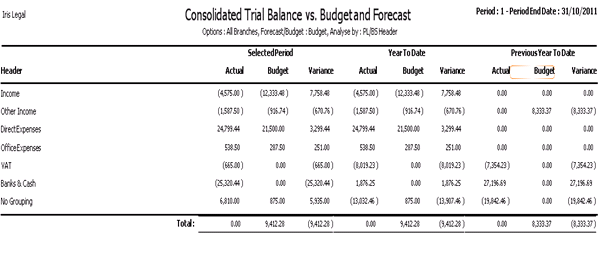
This report will provide an additional level of nominal grouping, allowing analysis levels showing monthly movement and year to date values.
— Accounts
What difference will I see?
In Report Manager, in the Accounts / Management Accounts folder, there is a new report called Consolidated Trial Balance vs Budget and Forecast . This report also makes use of the PL/BS Headers and Categories as described in the Consolidated Trial Balance report above.
How do I take advantage of this change?
To run the report, from Report Manager, expand the Accounts / Management Accounts folder and select Consolidated Trial Balance vs Budget and Forecast report
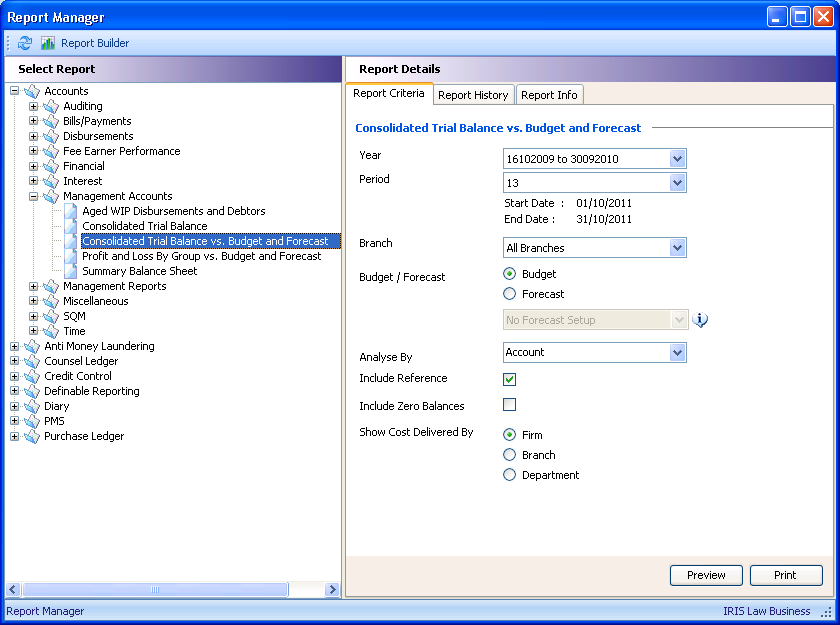
Selecting the new report displays the parameters on the right hand pane.
Year/Period, allows you to select the year and period for the report from the drop down lists. The values display the net sum of transactions within the selected period and year. The default values will be the current year and period.
Branch, allows you to select the report to run by All branches (consolidated) or by selected branch.
Budget/Forecast, allows you to select to run the report against a budget or forecast using the radio buttons. If forecast has been selected, use the drop down list to select a predefined forecast.
Analyse by, allows you to select to Analyse by Account, PL/BS Category or PL/BS Header.
Account will display values for every nominal account, excluding nominal types of "Income from Costs" (these items are displayed using the Show Costs Delivered option).
PL/BS Category will display values for every PL/BS Category with a subtotal of all nominal account values for each category, excluding nominal types of "Income from Costs" (these items are displayed using the Show Costs Delivered By option).
PL/BS Header will display values for every PL/BS Header with a subtotal of all nominal account values for each heading, excluding nominal types of "Income from Costs" (these items are displayed using the Show Costs Delivered By option).
Include Nominal Ledger Reference is only active if Account is selected for the analysis. If checked a column displaying the nominal ledger reference will be included on the report.
Include Zero Balances, if checked nominal accounts with a zero balance will be displayed in the columns, including last year's data. The default option is to not display zero balances, and there is a default to suppress rows in the report where there are zero balances in all columns.
Show Costs Delivered by (only available when the Analyse by Accounts is selected) will display the nominals of type "Income from Costs" by Firm, Branch or Department dependent on the radio button selected.
Administrators will need to give users access to the report, via Utilities / Licensing & Users / System Users, under the Features tab, in the Accounts / Access to Reports folder.
Note: This report uses new "header" fields which improve the performance of these reports. These fields are updated during the upgrade process and are updated automatically. However, if you suspect the figures are not correct, there is a utility that can be run to check the data. In the unlikely event of this happening, please call the Support Team on 0870 330 6688 and ask them to run the Check Data utility.
What benefit does this change bring to my business?
This report will enable you to use additional level of nominal grouping, allowing trend analysis showing monthly movement, year to date and previous year values plotted against budget or forecast values.
— Accounts
What difference will I see?
In Report Manager, in the Accounts / Fee Earner Performance folder, there is a new report called New Matters by Current Matter Fee Earner.
How do I take advantage of this change?
To run the report, from Report Manager, expand the Accounts / Fee Earner Performance folder and select New Matters by Current Matter Fee Earner report.
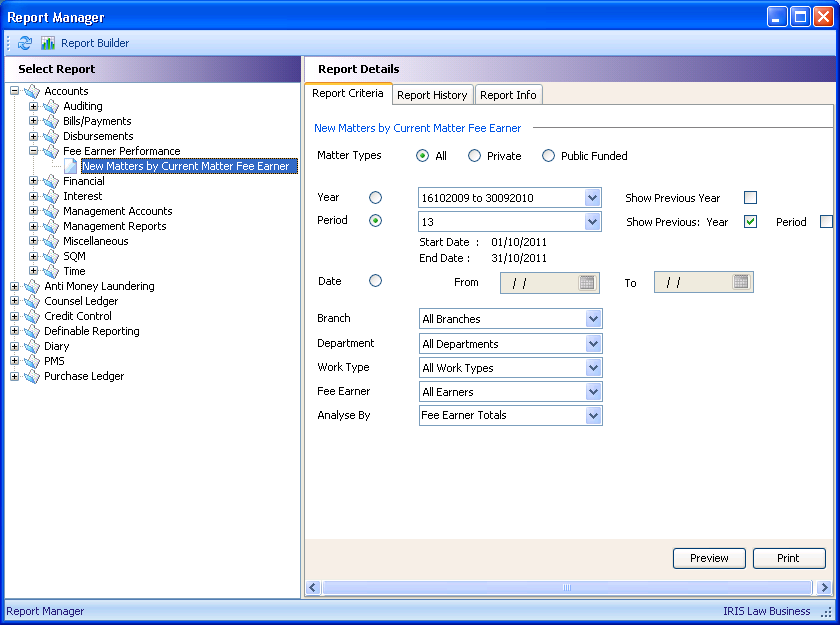
Selecting the new report displays the above parameters on the right hand pane. The report can be run either by Year, Period or Date range.
Matter Types, allows you to select the type of matters for the report, All matters, Private or Public Funded matters. The default is for All.
Year/Period/Date radio set allows you to select the reporting timescale:
Year, if selected, activates the year drop down to select the required year and allows the user to elect to display the figures from the previous year by checking the Show Previous Year box.
Period, default selection, allows the user to select the required period and elect to display the same period from the previous year and also previous period by checking the relevant Show Previous: Year / Period boxes.
Date, if selected, allows the user to use the date lookups or type in a "From" and "To" date to specify a date range for the report. If Date is selected but no range is entered, the report will cover all matters and the analysis will be by fee earner only.
Branch, allows the user to report on all branches or select a specific branch.
Department, allows the user to report on all departments or select a specific branch.
Work Type, allows the user to report on all work types or select a specific work type.
Fee Earner, allows the user to report on all fee earners or select a specific fee earner.
Analyse by, allows the user to select Fee Earner, Department, Department by Fee Earner, Work Type and Work Type by Fee Earner to give the required sub totals and totals.
Administrators will need to give users access to the report, via Utilities / Licensing & Users / System Users, under the Features tab, in the Accounts / Access to Reports folder.
Note: This report uses new "header" fields which improve the performance of these reports. These fields are updated during the upgrade process and are updated automatically. However, if you suspect the figures are not correct, there is a utility that can be run to check the data. In the unlikely event of this happening, please call the Support Team on 0870 330 6688 and ask them to run the Check Data utility.
What benefit does this change bring to my business?
The report will enable you to provide visibility of file opening trends by Fee Earner, Department and work type, over selected and previous periods and years.
— Accounts
What difference will I see?
In Utilities / Accounts, there is a new Aged Bands folder which have six bands set for the Aged report. The bands are customisable to allow firms to set bands to match their terms and conditions.
In Report Manager, in the Accounts / Management Accounts folder, there is a new report called Aged WIP Disbursements and Debtors report.
How do I take advantage of this change?
Initially, the administrator will need to check the bands for the Aged report. Default bands have been set up with the upgrade, but these may need customising to match your firm's billing terms and conditions.
From Utilities / Accounts, highlight the Aged Bands folder. In the right hand pane, you will see the default six bands.

To edit a band, right click on the band and select Edit. Amend the "From" and "To" as required. Click OK.
Note: For the last band, set the "To" to zero for infinity.
If your firm does not require all six bands, uncheck the "Show in Report" box for those not required.
Once the aged bands have been set, go to Report Manager and in the Accounts / Management Accounts folder, you will see the new Aged WIP Disbursement and Debtors report.
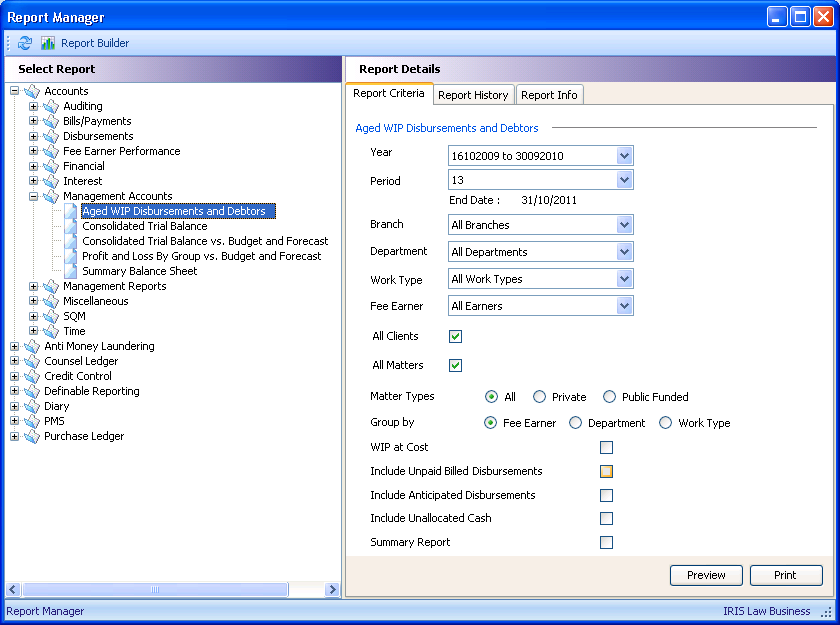
Selecting the report, you will see the above parameters in the right hand pane.
Year and Period, allows users to select the start date. The current period is the default selection.
Branch, allows users to select All or a specified branch to report on.
Department, allows users to select All or a specified department to report on.
Work Type, allows users to select All or a specified work type to report on.
Fee Earner, allows users to select All or a specified fee earner to report on.
All Clients, default is checked. If unchecked, two lookups display to allow users to enter a "From" and "To" range for clients.
All Matters, default is checked. If unchecked, two lookups display to allow user to enter a "From" and "To" range for matters.
Matter Types, allows users to select either All, Private or Public Funded matters.
Group by, allows users to group by Fee Earner, Department or Work Type.
WIP at Cost, allows users to change from the default, which is WIP at Charge.
Include Unpaid Billed Disbursements, allows users to include not yet paid disbursements. Default is unchecked.
Include Anticipated Disbursements, allows users to include unpaid, un-billed disbursements. Default is unchecked.
Include Unallocated Cash, allows users to include unallocated cash. Default is unchecked.
Summary Report, allows users to produce a detailed or summary report. Default is Detailed which displays matters per grouping. The Summary report will show group sub-totals only.
Administrators will need to give users access to the report, via Utilities / Licensing & Users / System Users, under the Features tab, in the Accounts / Access to Reports folder.
Note: This report uses new "header" fields which improve the performance of these reports. These fields are updated during the upgrade process and are updated automatically. However, if you suspect the figures are not correct, there is a utility that can be run to check the data. In the unlikely event of this happening, please call the Support Team on 0870 330 6688 and ask them to run the Check Data utility.
What benefit does this change bring to my business?
The report will enable you to manage lock up (unrealised working capital) to assist in bill production and payment of bills. The agedness of the report columns can be customised to match billing terms and conditions.
— Accounts
What difference will I see?
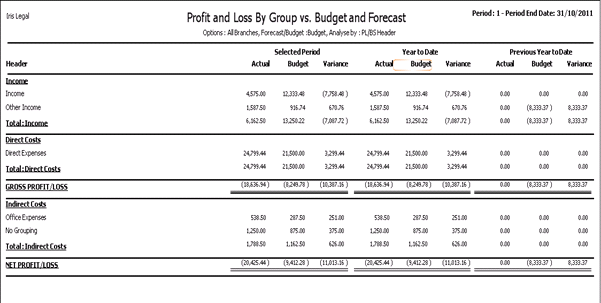
From Report Manager, in the Accounts / Management Accounts folder, there is a new report called Profit and Loss by Group vs Budget and Forecast report.
How do I take advantage of this change?
The new report allows for analysis by Account, PL/BS Header and PL/BS Category and also gives you the choice of the Header that covers the Direct Costs.
To set the Direct Costs Header, go to Utilities / Accounts and select the PL/BS Header folder.
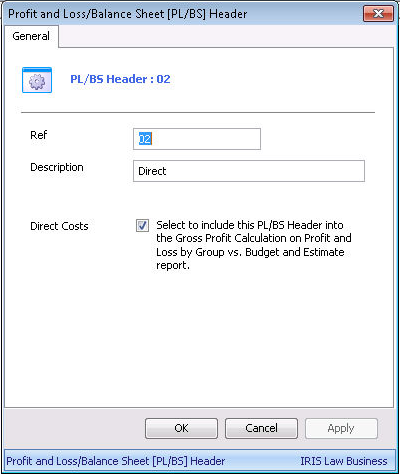
Right click on the Direct header and select Edit (or double click) and ensure the Direct Costs box is checked.
Note: Only one header can be selected for this use and if you check this box on another header, you will get a warning that if you proceed, this option will be removed from the other header.
To run the report, go to Report Manager, expand the Accounts / Management Accounts folder and select Profit and Loss by Group vs Budget and Forecast.
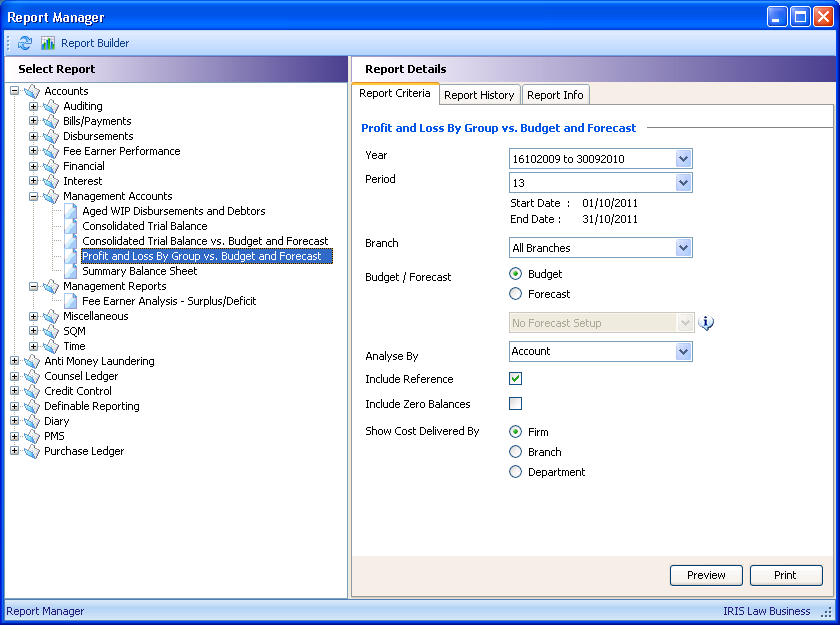
Selecting the report you will see the above parameters in the right hand pane of the screen:
Year, drop down allows user to select required year (defaults to current year)
Period, drop down allows user to select the required period (defaults to current period)
Branch, drop down allows user to select All branches or a specific branch.
Budget / Forecast, radio set, default to nominal budget as shown on the nominal ledger. If Forecast is selected the drop down activates and allows user to select a predefined forecast for the selected year.
Analyse by, allows user to select Account, PL/BS Category or PL/BS Heading:
Account - show values for every nominal, excluding ledgers with a type of "Income from Costs". These items are displayed using the Show Costs Delivered By items below.
PL/BS Catergory - shows values for every PL/BS Category, excluding nominals of type "Income from Costs". These items are displayed using the Show Costs Delivered By items below.
PL/BS Heading - shows values for every PL/BS Heading, excluding nominals of type "Income from Costs". These items are displayed using the Show Costs Delivered By items below.
Include Reference, only available is Analyse by Account is selected, if checked a column displaying the nominal ledger reference will be included.
Include Zero Balances, if checked then nominal ledgers with zero balances in all of the columns, including budgets and last year's data are included in the report.
Show Cost Delivered by (only available when the Analyse by Accounts is selected) radio set to display by Firm, Branch or Department for nominal ledgers of type "Income from Costs" totalled by the selected radio button.
Administrators will need to give users access to the report, via Utilities / Licensing & Users / System Users, under the Features tab, in the Accounts / Access to Reports folder.
Note: This report uses new "header" fields which improve the performance of these reports. These fields are updated during the upgrade process and are updated automatically. However, if you suspect the figures are not correct, there is a utility that can be run to check the data. In the unlikely event of this happening, please call the Support Team on 0870 330 6688 and ask them to run the Check Data utility.
What benefit does this change bring to my business?
The report will enable you to produce profit and loss trend analysis showing monthly movement, year to date and previous year values plotted against budget or forecast values. Inclusion of Indirect and Direct Costs and Gross Profit calculations allow further flexibility
— Accounts
What difference will I see?
In Report Manager in Accounts / Management Accounts folder, there is a new report, Summary Balance Sheet, which gives the current financial standing at a given point in time.
How do I take advantage of this change?
From Report Manager, expand the Accounts / Management Accounts folder and highlight the Summary Balance Sheet.
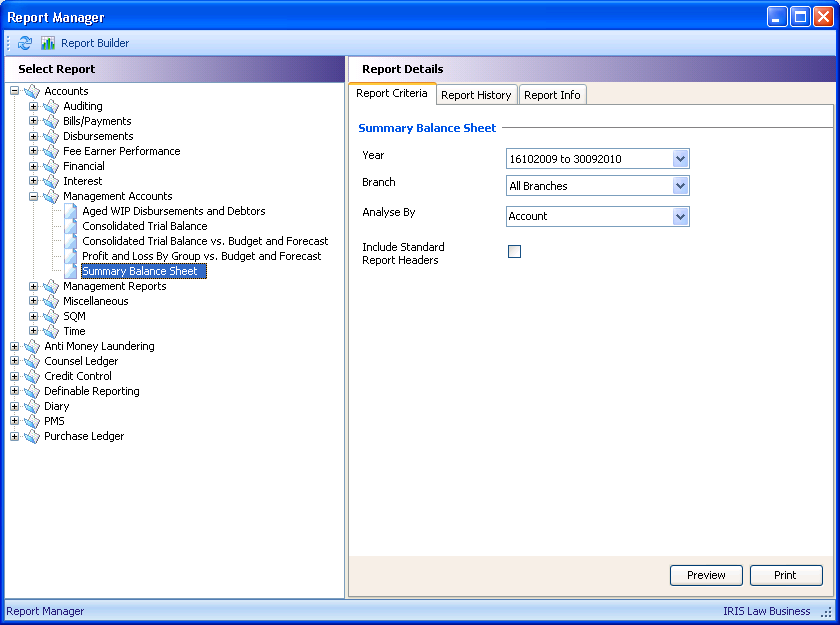
The parameters available in the right hand pane are:
Year, allows you to select the year, defaults to the current year.
Branch, allows you to select a specific branch, defaults to All Branches.
Analyse by, allows you to select Accounts, PL/BS Categories or PL/BS Headers.
Include Standard Report Headers, if unchecked, will not display the usual group headers such as Fixed Assets, Current Liabilities, but will still group the figures by nominal type.
Report Headers.
|
Headers |
Description |
|
Assets |
First header in the report. |
|
Current Assets |
Nominal types of current assets, pre-payments, petty cash, LSC payment, including the office ledger balance (Disbursements and Bills). Office banks are included, unless overdrawn when they move to current liabilities. Note: if you wish to distinguish between tangible and intangible assets, then create PL/BS headers called "Tangible" and "Intangible" in the "Fixed Assets" category, then assign these to the relevant nominal accounts. This will provide these sub-headings in your report. See the screen shots below for an example.* |
|
Current Liabilities |
Nominal types of VAT control, unpaid VAT, unpaid costs, unpaid billing disbursements, purchase ledger control, counsel ledger control, accruals, office balance equity, other system nominal, current liabilities. |
|
Net Current Assets |
Calculation of Current Assets – Current Liabilities. |
|
Long Term Liabilities |
Nominal type of Long Term Liabilities. |
|
Net Assets |
Calculation of Total Assets - Total Liabilities |
|
Capital |
Nominal types of profit share, partner accounts, Profit and loss (income from costs, other income less bill write off, expenditure and interest). |
If no nominal ledger balances are shown for all nominal ledgers associated with a heading group then the heading is not displayed. E.g. Long term liabilities, if there are no nominal balances on nominal ledgers assigned to type long term liabilities, then the heading is not displayed.
* Tangible and Intangible Assets example:
Create a PL/BS Header called “Net Fixed Assets” and PL/BS Categories called "Tangible" and "Intangible". Assign the relevant nominals to the categories. This allows the report to show the totals required as below by:
PL/BS Header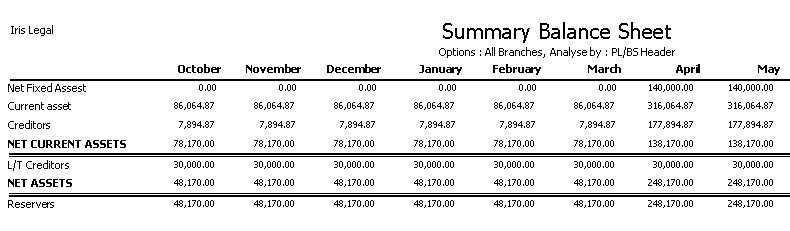
PL/BS Category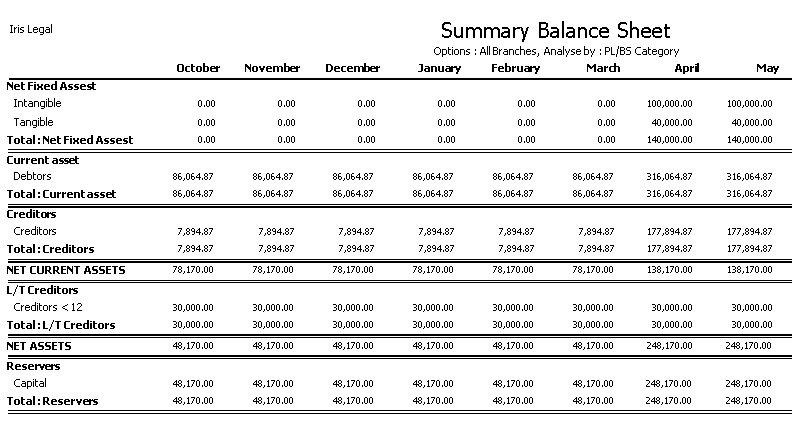
Account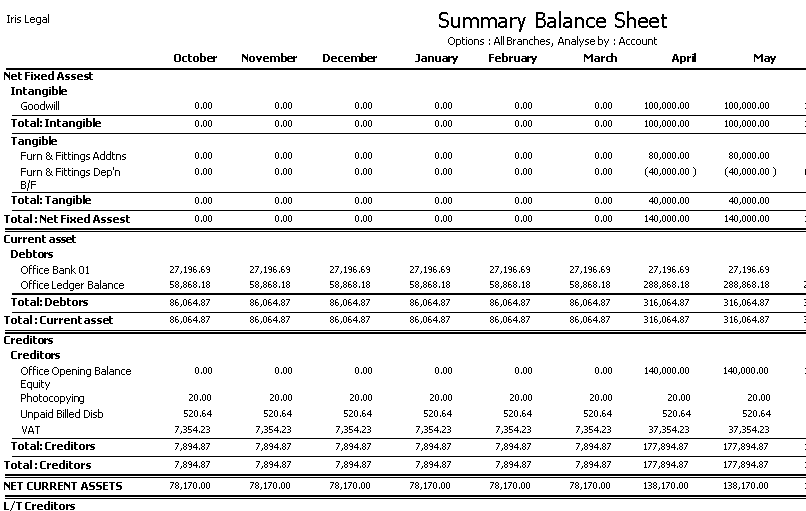
Administrators will need to give users access to the report, via Utilities / Licensing & Users / System Users, under the Features tab, in the Accounts / Access to Reports folder.
Note: This report uses new "header" fields which improve the performance of these reports. These fields are updated during the upgrade process and are updated automatically. However, if you suspect the figures are not correct, there is a utility that can be run to check the data. In the unlikely event of this happening, please call the Support Team on 0870 330 6688 and ask them to run the Check Data utility.
What benefit does this change bring to my business?
The report will enable you to provide multi-level nominal grouping, allowing trend analysis over the financial year and monthly movement.
What has changed?
Appointments and Tasks created in IRIS Law Business can now be replicated in Microsoft Exchange 2010. Likewise, Appointments and Tasks created in Microsoft Outlook can be replicated, via Microsoft Exchange, in IRIS Law Business and can be assigned to clients and matters.
Note: Only Exchange 2010 is supported; Outlook 2010/2007 and even 2003 will work with this version of Exchange, although Microsoft note a number of issues on their web site. IRIS recommend using Outlook 2010 with Exchange 2010 for best results.
How do I take advantage of this change?
This feature is chargeable and if you would like to take advantage of it, please contact your account manager or call our Sales Team on 0844 815 5575.
The Exchange Server Web Services are installed by default with Microsoft Exchange 2010.
The Client Access Server role, Unified Messaging and Autodiscover need to be switched on and an Off-line Address Book should be created.
Permissions need to be setup for the above roles and a mail account should be created.
Note: This solution is not supported if IP v6 is enabled on your Exchange server or client machine.
For the synchronisation to take place, there are some system parameters that need to be set.
The first is set by IRIS only, the EwsPath. This holds the path to the Exchange.asmx file on your Exchange server.
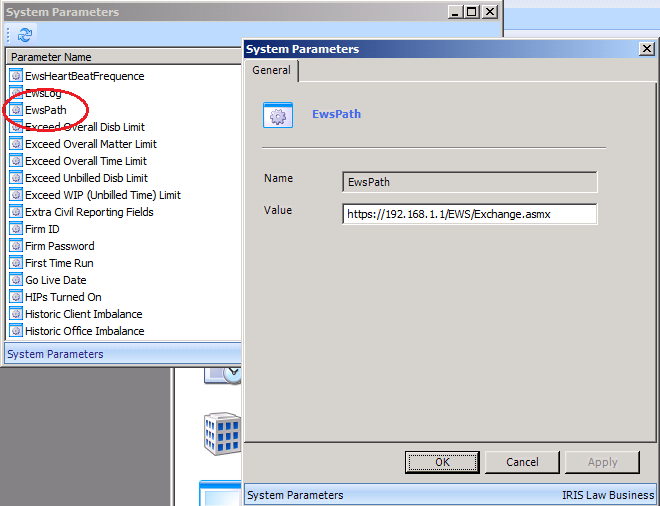
Note: Following upgrade, this field will be blank as a default.
In order to keep the link between ILB and Exchange live, there is a system parameter, EswHeartBeatFrequence. This instructs Exchange how often to ask ILB if it still requires information and if it does not get a response, it will drop the link.
From Utilities / System Parameters, highlight EwsHeartBeatFrequence, right click and select Edit.
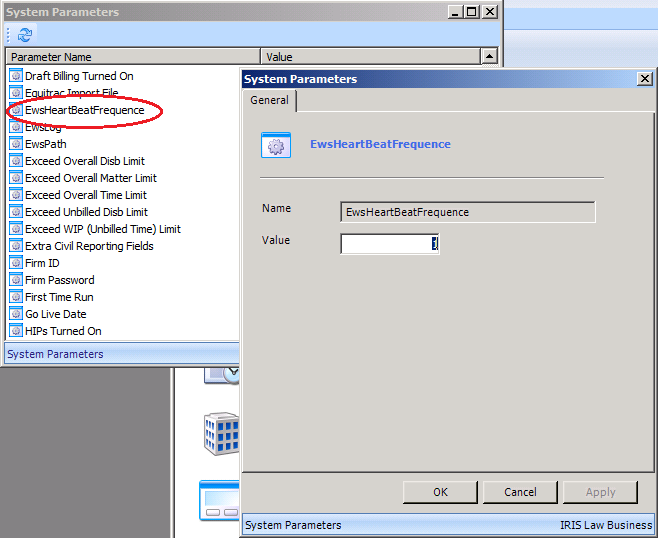
The figure in the Value field is in minutes and the default is 1 minute. If you find the default setting is causing an impact on the system, you can increase the value and click OK. A longer heartbeat frequence will have less impact on your system.
If you experience problems with the webservice, you can produce a log file recording the synchronisation.
From Utilities / System Parameters, highlight EwsLog right click and select Edit.
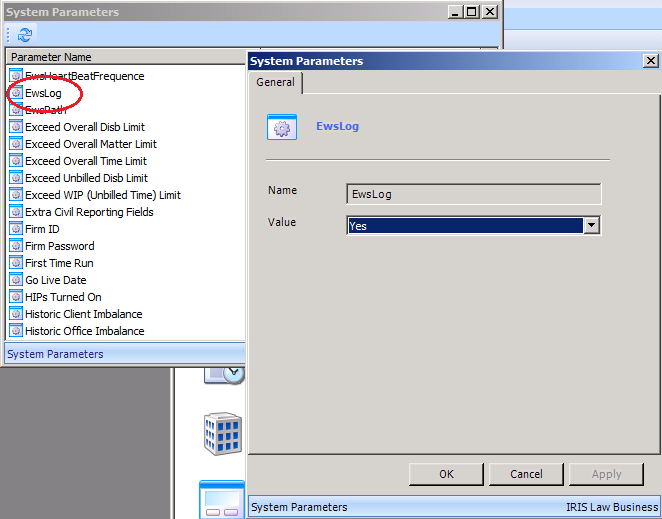
Once the value is set to Yes, a log file will be generated called EWSLog.txt which will be stored in the C:\Program Files (x86)\IRISLaw\PMS folder on your database server.
Note: This should not be switched on unless you are experiencing connectivity problems in which case it will assist in debugging the problem.
ILB needs to be advised how far forward in to the future to synchronise the diaries.
From Utilities / System Parameters, highlight Diary Sync Forward Period, right click and select Edit.
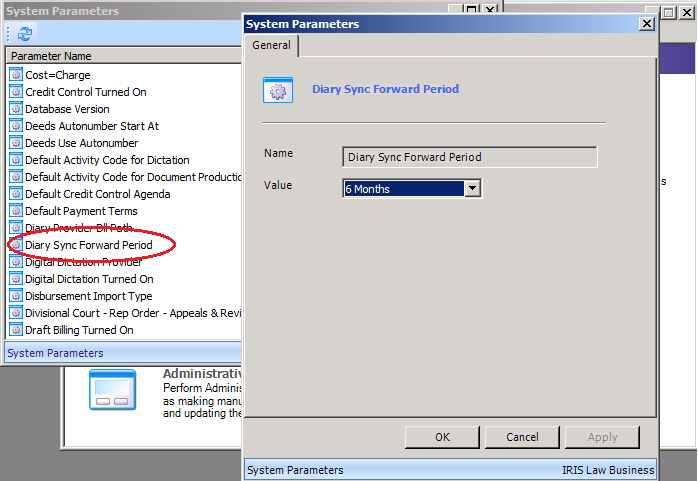
Use the drop down to select the Forward Period up to a maximum of 2 years. Click OK.
Note: The longer the period, the longer the synchronisations will take.
You need to link the ILB user to the Exchange user using the email address associated with the user's Active Directory account on your domain and give permissions to allow the synchronisation. The users' windows credentials are sent to the webservice for authentication purposes.
From Utilities / Licensing and Users expand the System Users / Users folder and select Staff.
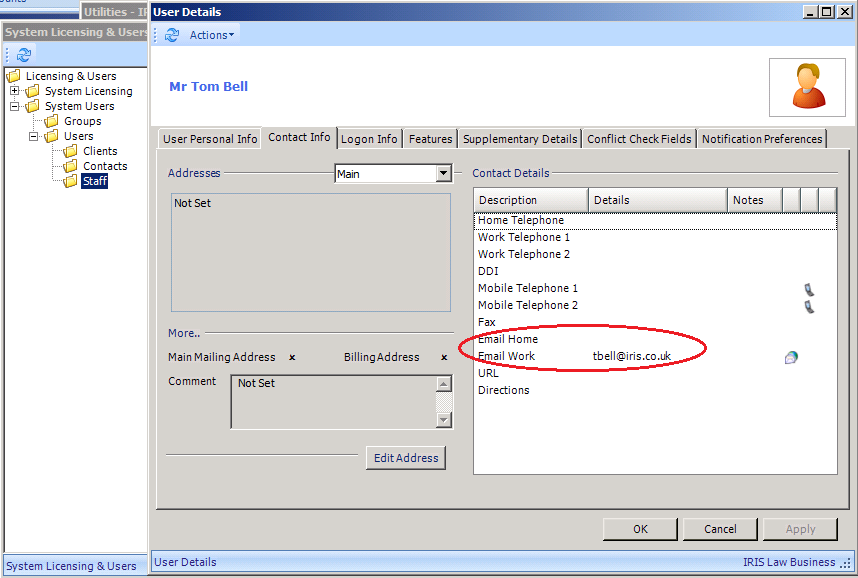
On each user, right click, select Edit and click on the Contact Info tab.
Enter the email address for the user which will be passed to the Exchange server in order to link the ILB user to their Exchange record. You should use the email address associated with the login details used to log in to their computer.
Click Apply.
Note: IRIS Law Business will search either the work or home email address. If both are completed, the system will default to the work email address.
Limitation: This feature will only work with individual email addresses as opposed to group email addresses.
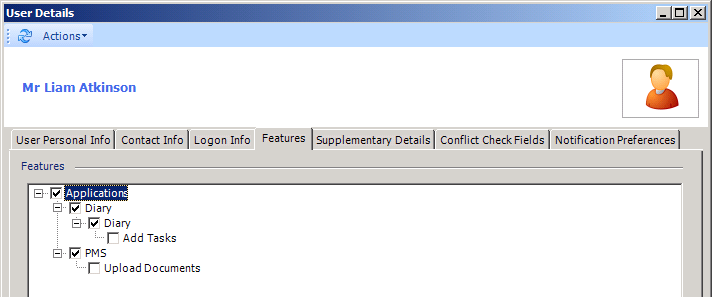
To enable the synchronise tool, click on the Features tab.
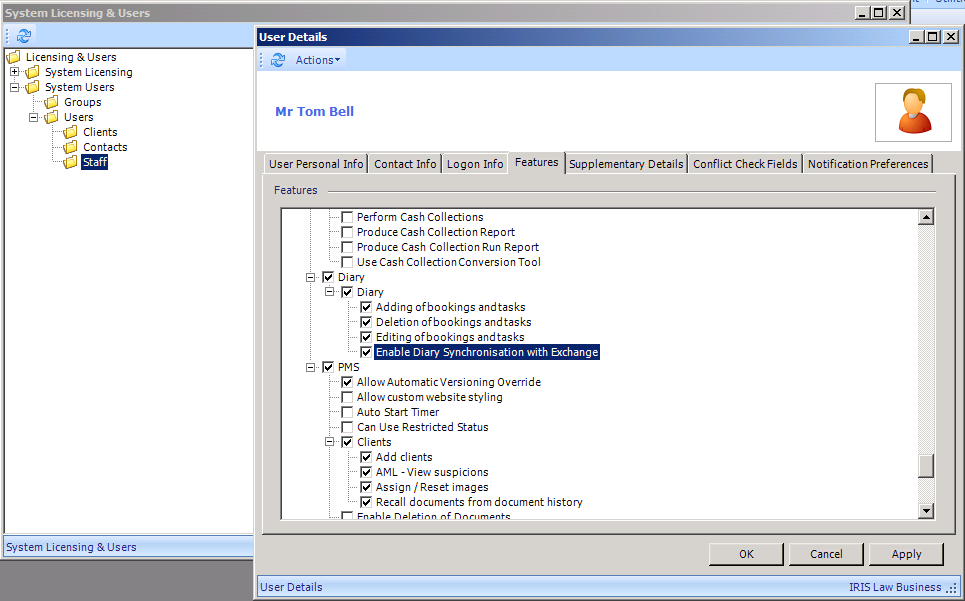
In the Diary folder, check Enable Diary Synchronisation with Exchange. Click OK.
— Integration | Read more ![]()
What difference will I see?
Once the ILB system and user setup has been completed, the PMS Tool displays the new sync Diary tool and the Pending Exchange Items tool has been moved under User Details on the Ribbon bar..

A sync Diary tool has also been added to the Diary ribbon in the User Details section.

How do I take advantage of this change?
This feature is chargeable and if you would like to take advantage of it, please contact your account manager or call our Sales Team on 0844 815 5575.
Note: For synchronisation to take place, the PMS application must be open.
Users will be prompted to synchronise the first time they open the Diary after the synchronisation setup has been completed.
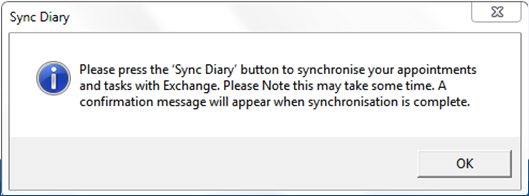
Note: Users will be prompted to synchronise each time they open the diary until they run the initial synchronisation.
To start the synchronisation, click on the Sync Diary tool on the ribbon. The following prompt displays:
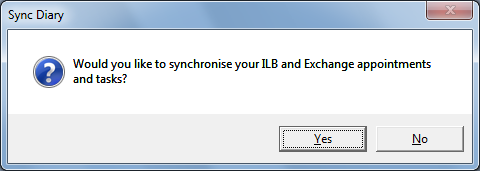
On clicking Yes, the Synchronising Diary with Exchange bars display.

At the end of the process, you are asked if you would like a report of the synchronisation results.
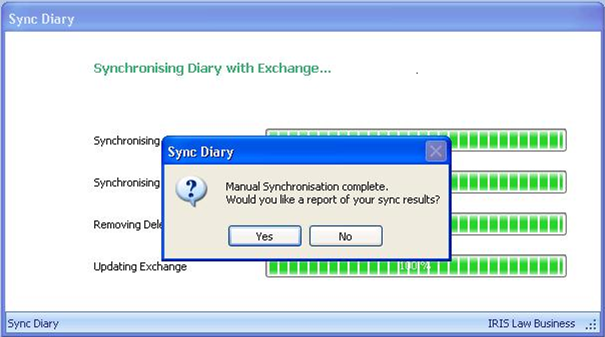
If you click on Yes, a report is generated. For detail on this report see the Reporting section.
During the synchronisation, entries are treated as follows:
Appointments and tasks in ILB Diary will be added to Exchange.
Appointments and tasks in Exchange will be added to the ILB Diary Pending area to allow users to assign client and/or matter details to the item.
Appointments with the same date and time will be placed in the pending area for users to decide whether to accept or reject. See [LCSILB-6694] for full details.
Items will not be deleted from either Exchange or the ILB Diary.
Once the initial synchronisation has taken place, users can manually synchronise using the Sync Diary tool on the PMS or Diary ribbons. The synchronising process and prompts are the same as in the initial synchronisation, but the rules applied during the synchronising are slightly different:
Appointments and tasks marked for deletion in Exchange will be deleted in the ILB Diary.
Appointments and tasks which have been updated in Exchange will be updated in the ILB Diary.
New appointments and tasks will go into the ILB Diary and the Pending Area for users to action as required, i.e. reject or accept and attach to a client or matter. Any clashes will be dealt with according to [LCSILB-6694].
Create task or appointment in the ILB Diary: create as usual in the ILB Diary and the task or appointment will be created automatically in Outlook.
Recurring appointments created or amended in the ILB Diary will be created or amended in Outlook.
When a group appointment, with multiple participants, is created in the ILB Diary, each user with a valid mail account setup in ILB will receive the appointment invitation in Outlook.
Note:
Recurring appointments created or amended in the Outlook will be created or amended in the ILB Diary.
If you do not enter a time for an appointment in IRIS Law Business, the appointment in Outlook will show as 00:00.
Create task or appointment in Outlook: create as usual in Outlook. Switch back to the ILB Diary and select the Tools ribbon and click on "Pending Exchange Items".
A list of items displays.
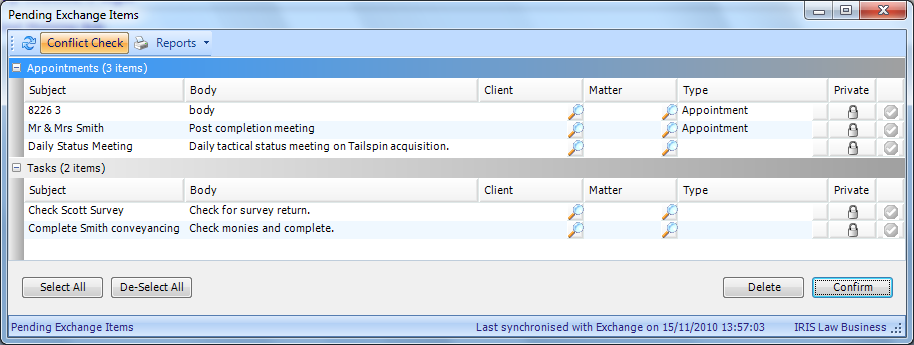
In the Pending Area, the following tools can be used for:
|
Item |
Description |
|
Client lookup |
Displays the Client Search dialog box to assign an item to a client. |
|
Matter lookup |
Displays the Matter Search dialog box to assign an item to a matter. |
|
Tick |
Turns green |
|
Select All |
Selects all items in the Pending Area. |
|
De-Select All |
De-selects all selected items in the Pending Area. |
|
Delete |
Rejects all selected items in the Pending Area. |
|
Confirm |
Accepts all selected items in the Pending Area. |
For accepted appointments the Exchange/ILB Diary Clash Check then takes place. For more information on this, click Clash Check.
Note:
Recurring appointments created or amended in the Outlook will be created or amended in the ILB Diary.
As Exchange is the 'master', items that have been previously rejected will appear in the Pending Area when you next synchronise.
Items updated in Exchange do not appear in the Pending Area, the update is applied directly to the ILB Diary item.
Venue details added in Exchange will not be pulled through to the ILB Diary as the Exchange field is free text whereas the ILB Diary is a drop down list.
Currently there is a conflict between the way the ILB Diary and Exchange handles amended recurring tasks. In the ILB Diary, when the recurrence is changed then the due date of the task is changed. In Exchange, it creates a second task which will be created in the ILB Diary on the next synchronisation.
In the Pending screen and the ILB Diary application, towards the right side of the status bar it displays if a synchronisation has yet to take place, and if it has, the date and time of the last synchronisation.
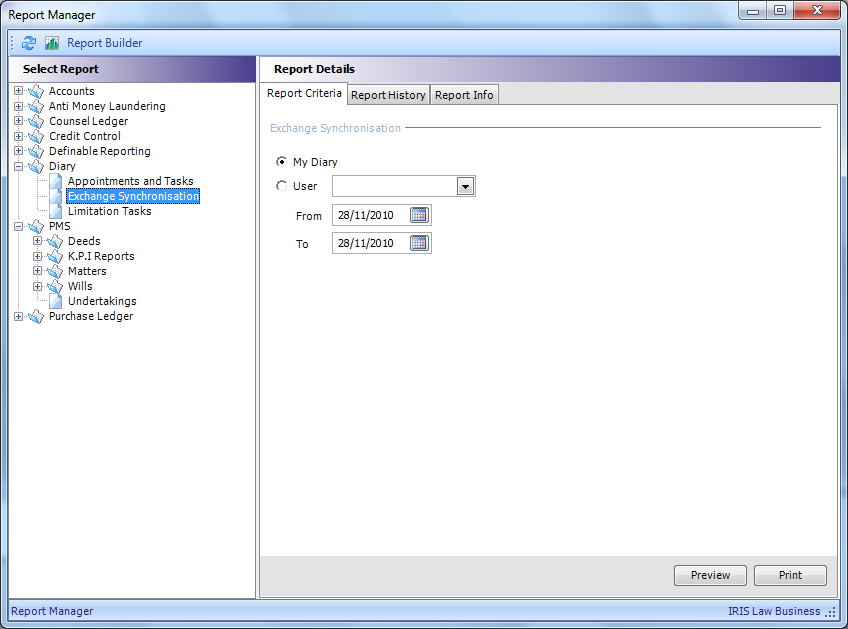
There is a new report which details the user name, date and time of the synchronisation, number of appointments and tasks updated, added to and deleted from the ILB Diary.
The report can be printed and saved and can be revisited via the Report Manager / Diary folder, Exchange Synchronisation.
At the end of the initial synchronisation and any subsequent manual synchronisation, you are presented with a prompt asking if you would like a report.
This report details appointments added, updated or deleted from the ILB Diary with any relevant client/matter information, any tasks added, updated or deleted from the ILB Diary with any relevant client/matter information. The total number of appointments and tasks added to, deleted from or updated.

In addition to the Synchronisation report, you can report on the items in the pending area.
The Reports menu in the Pending Area drops down an Export to Excel option. You are prompted to give the file a name and select a location for the file. The following report then opens in Excel.
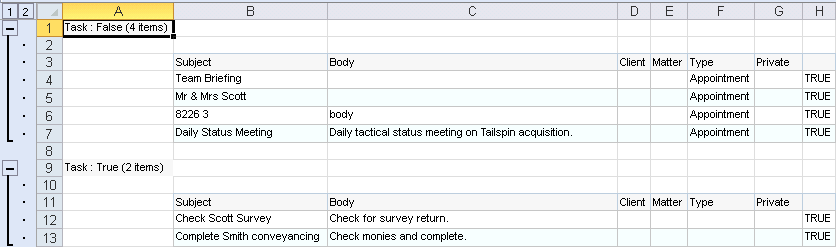
The export can be customised by using the right click in Pending Area which displays a shortcut menu with the option of Show Column Chooser. This displays a list of available headings on the left of the pane which can be displayed or hidden to be subsequently used in the Export to Excel option.

Right click again gives the option to Hide Column Chooser.
What benefit does this change bring to my business?
Users' IRIS Law Business and Microsoft Outlook Diaries can now be kept synchronised. Appointments made by staff in the office can be replicated to a fee earner's mobile device using the Exchange synchronisation feature to ensure their diary is up to date.
Below is a list of limitations to the integration between IRIS Law Business Diary and Microsoft Exchange. These are owing to the differences in the way that the two applications work.
|
If you ... |
This happens ... |
Because ... |
Workaround |
|
In Outlook, create a recurring appointment with No End Date. |
An error is displayed in ILB. |
ILB requires that recurring appointments have an end date. |
Always use an end date when creating recurring appointments in Outlook. |
|
In Outlook, create an appointment with a recurrence pattern of Weekly with 2 or more days selected and set to end after a set number of occurrences. Example: Create a weekly appointment for 2 days a week to end after 6 occurrences. |
Outlook: Creates the appointments ending after 3 weeks, i.e. 6 occurrences ILB Diary: Creates 6 weekly appointments twice a week. |
Outlook and ILB Diary use different definitions of "occurrence". |
When creating such appointments in Outlook always use End by: and specify a date. |
|
In Outlook, delete an appointment whilst ILB is offline. |
The item is not deleted from the ILB Diary. |
Outlook changes the reference ID of deleted items. If ILB is offline, it cannot know about the deletion and there is no method of cross checking the new reference ID. |
Ensure that ILB is open when deleting appointments in Outlook. |
|
In Outlook, create an appointment that spans more than one day. |
The appointment only appears on the first day in ILB |
Multi-day appointments are handled differently in Outlook and ILB. |
Create a separate appointment for each day. |
|
In ILB Diary, edit a task. |
Outlook may not show the change. |
There can be a delay before Outlook is updated. |
Close and re-open Outlook Tasks, e.g. view the Outlook Calendar and then go back to Tasks. |
|
In ILB Diary, edit one occurrence of a recurring task. |
Outlook does not show the change. |
Outlook only creates one task and recurrences are created by copying this task. |
Create separate tasks. |
|
In ILB Diary, delete one occurrence of a recurring task. |
In Outlook, all occurrences of the task are deleted. |
Outlook only creates one task and recurrences are created by copying this task. |
In ILB, delete all occurrences of the task and recreate with separate tasks. |
What difference will I see?
From the main PMS or Diary ribbon, clicking on the "Pending Exchange Items" tool displays a dialog box where users can elect to accept or reject tasks or appointments. When an appointment is accepted, ILB runs a Clash Check against existing appointments in the ILB Diary.
How do I take advantage of this change?
The flowchart below details the logic followed for items in the Pending Area.
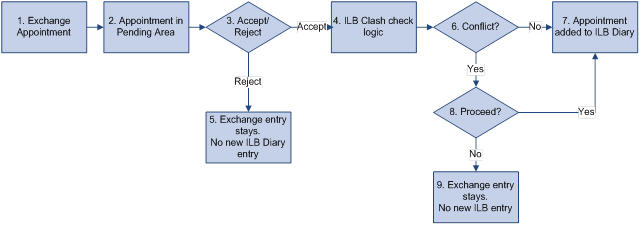
The above translates to the following user experience.
When the user clicks on the Confirm button with an appointment selected in the Pending Area, if there is no clash, the appointment will be created in the ILB Diary.
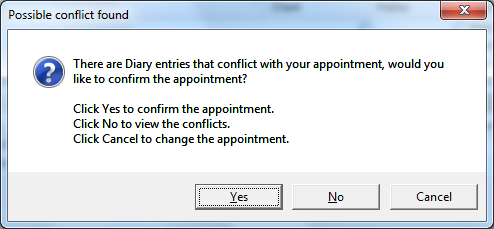
If there is a clash between an existing ILB Diary appointment and the appointment in the Pending Area, the following message displays:
The buttons work as below:
|
Button |
Description |
|
Yes |
Creates the appointment in the ILB Diary alongside the existing ILB appointment. |
|
No |
Displays the Appointment Conflict dialog box for further investigation. See below. |
|
Cancel |
Returns the user to the Pending Items area. |
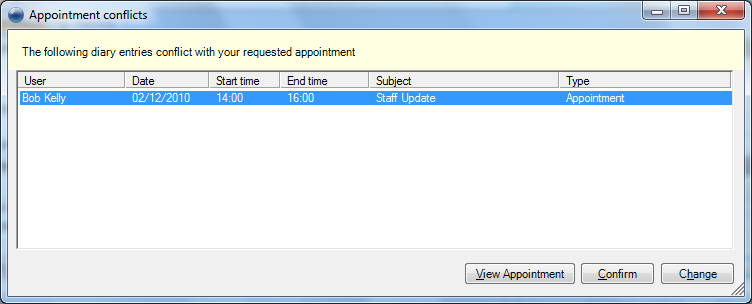
The buttons work as follows:
|
Button |
Description |
|
View Appointment |
Displays the Appointment details of the existing ILB appointment. |
|
Confirm |
Confirms the new appointment alongside the existing ILB appointment. |
|
Change |
Returns the user to the Pending Area dialog box. |
What benefit does this change bring to my business?
Users can compare new Exchange appointments which clash with existing ILB Diary appointments and select which ones they wish to add into the ILB Diary.
— Integration
What difference will I see?
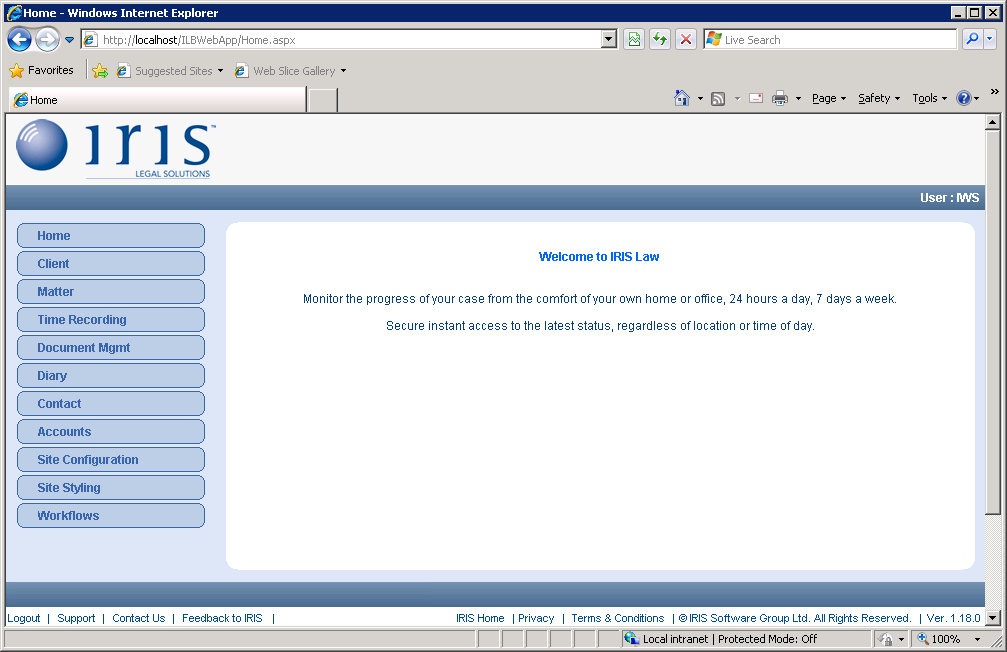
There will be no difference in the Windows version of IRIS Law Business, FED is accessed via the Internet Explorer by going to an address such as https://192.168.3.11/ilbwebapp, where 192.168.3.11 is the ip address of your server. Users log on with their standard ILB username and password. Once in, FED is simple to use and uses the same windows and procedures, albeit visually slightly different, as below for the client details:

Clients and Referrers can also access their details, given the relevant permissions and they see a cut down version, showing their client and matter details (or referred matters), document history, diaries and bill details (clients only).
How do I take advantage of this change?
This feature is chargeable and if you would like to take advantage of it, please contact your account manager or call our Sales Team on 0844 815 5575.
FED gives access to the following features of ILB:
|
Menu Item |
Description |
|
Client |
Search and add clients, plus update any client details. |
|
Matter |
Search and add matters, plus update any matter details. |
|
Time Recording |
Display a timesheet and create a time posting. |
|
Document Mgmt |
View the matter history, upload and amend documents. |
|
Diary |
View and create appointments and tasks. |
|
Contact |
Search, create and attach contact, plus update any contact details. |
|
Accounts |
Request cheques, authorise cheques (if allowed), add and view draft bills, view financial balances and a range of ledgers. |
|
Site Configuration |
For administrators with the "Allow custom web site styling" permission under the PMS folder in Features from User Details in Utilities, can customise various pages. |
|
Site Styling |
For administrators with the "Allow custom web site styling" permission under the PMS folder in Features from User Details in Utilities, can customise the display options. |
|
Workflows |
Allows users to search for and run tasks against clients and matters. Note: This option is displayed only when the Workflow integration has been switched on. |
With the exception of Site Configuration, Site Styling (administrator features) and Workflows (new feature), the other options work and display like the standard IRIS Law Business features from PMS and Accounts.
For more information on the use of FED, please see the on-line help section for FED or download the pdf version of the FED Manual.
Clients can also access the Fee Earner Desktop, although they have reduced access. In cases where clients have been introduced by 'referrers' and the clients have given the relevant permission, it is also possible for the referrers to access matters of clients they introduced.
To set up Clients for access via the web, they need a valid email address in their Client Details under Contact Details tab. This can be either a work or home email address.
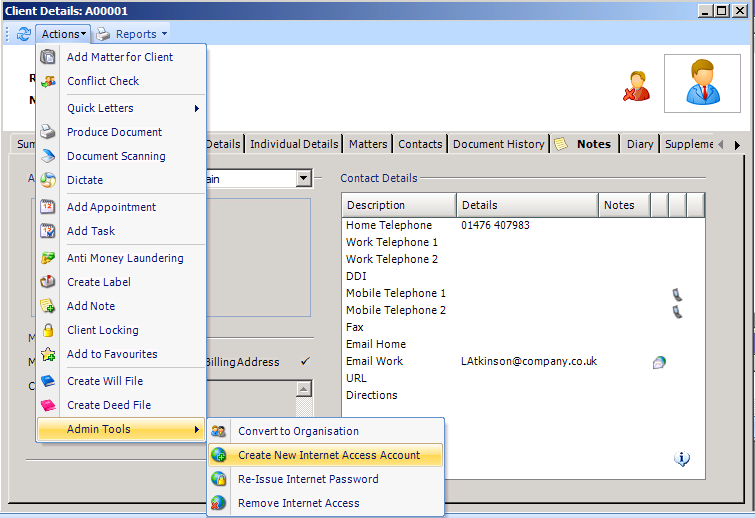
From the Actions / Admin Tools menu select Create New Internet Access Account. An email is generated and sent to the client advising them that their username is their email address and provide an initial password.
Note: when “Create New Internet Access Account” is selected from the Actions menu in PMS, the client’s home address is used if they have both home and work addresses. If they only have a work address, that is used. Whichever address is present when the account is created remains the username that client uses to log in, even if subsequently amended in the PMS database.
Should the client wish to change their username to an updated email address, you will need to remove and re-issue their credentials using the Remove Internet Access and Create New Internet Access Account options.
Clients can also be given permission to upload documents and/or add tasks to their matters. To give clients this access, go to Utilities / Licensing and Users, expand the System Users and Users folders and select Clients. On the right side, right click the Client and select Edit.
From the Features tab, select Add Tasks from the Diary folder and Upload Documents from the PMS folder as required.
If a separate stylesheet has been set up for clients to use, as opposed to the standard one Fee Earners see, you can click on the Logon Info tab and enter the name of the stylesheet in the Stylesheet field.
When the client logs on the first time, they will be recommended to change the password to one of their choice.
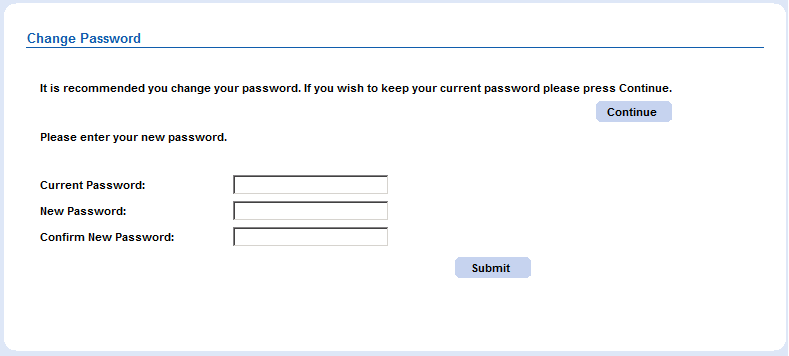
Should they not change the password now, they can use the Change Password link at the bottom of the screen at any time to make this change.
Should the client forget the password, there is a Re-Issue Internet Password option from the Admin Tools menu.
Access to the Client Self-Service can be removed at any point by selecting Remove Internet Access option from the Admin Tools menu. An email will be sent to the client confirming that the internet access account has been cancelled.
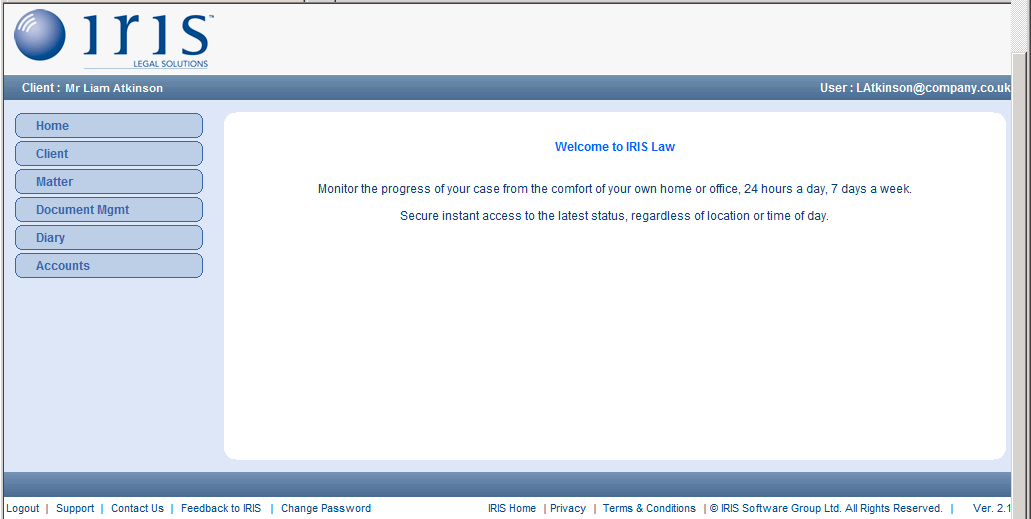
When the client logs in, they see the following Home screen, which fewer features than the fee earners' Home screen..
|
Parameter |
Description |
|
Home |
Returns the client to this Home screen. |
|
Client |
Allows the client to view their details. |
|
Matter |
Allows the client to view their matters and matter details. |
|
Document |
Allows the client to view a list of documents marked as Public from the matter history and upload documents, if they have been given such permission. |
|
Diary |
Allows the client to view matter tasks marked as public and add, if relevant permission given, tasks. |
|
Accounts |
Allows the client to view their bill details, |
The links at the bottom of the screen work the same as the fee earner links plus they have the Change Password link which will allow them to change their password at any time.
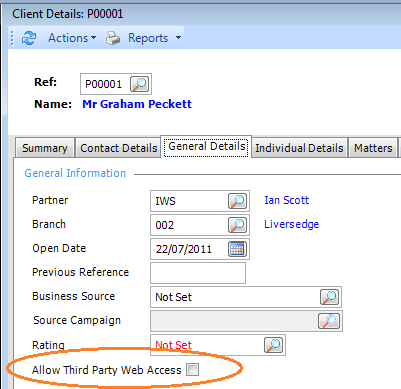
To give a referrer access to matters they have instigated, the client record needs to be flagged that the client has given permission.
In the Client Details, from the General Details tab, check the box Allow Third Party Web Access box.
For the Referrer setup, similar to the client, the contact needs to have a valid Work or Home email address under the Contact Info tab and from the Actions, Admin Options menu, take the Create Internet Access Account option, which will send off an email advising the username (email address) and providing a password. The referrer will be prompted to change the password as they log in for the first time, but then can continue without doing so and can change it at a later stage
Referrers then need to be assigned to a client's matter as a contact of type Referred to us by.
Referrers can be given permissions to Add Tasks and Upload Documents. Go to Utilities / Licensing and Users, expand the System Users and Users folders and select Contacts. On the right side, right click the Client and select Edit. From the Features tab, select Add Tasks from the Diary folder and Upload Documents from the PMS folder as required.
If a separate stylesheet has been set up for referrers, or particular referrers, to use, you can click on the Logon Info tab and enter the name of the relevant stylesheet in the Stylesheet field.
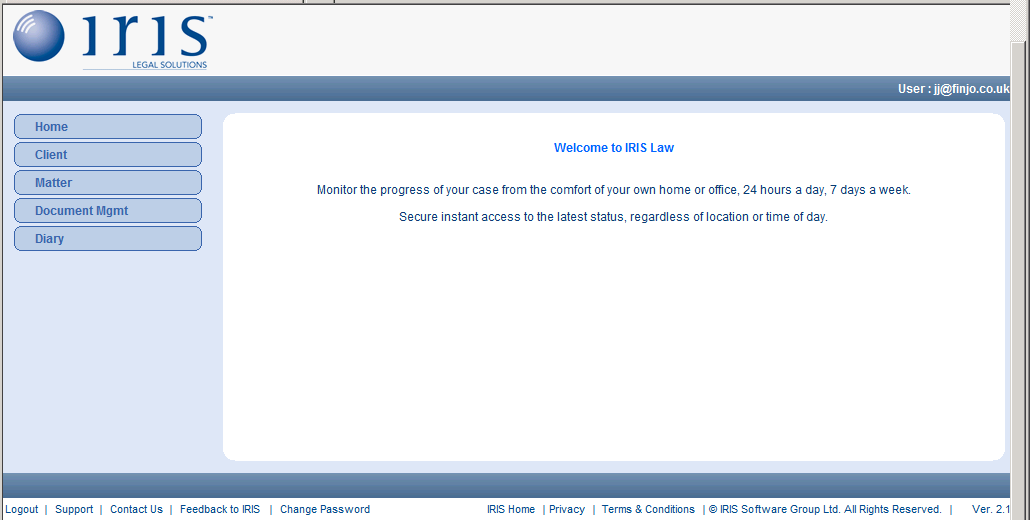
When the Referrer logs in they see a Home screen similar to that of the client, although they do not have access to the Accounts option on the navigation bar.
|
Parameter |
Description |
|
Home |
Returns the referrer to this Home screen. |
|
Client |
Allows the referrer to search for clients where the client has given permission and they are listed as "Referred to us by" type contacts and to view their own details. |
|
Matter |
Allows the referrer to search for and view matters and matter details where they are the "Referred to us by" contact type and the client has given permission for such access. |
|
Document |
Allows the referrer to view a list of documents marked as Public from the matter history and upload documents, if they have been given such permission. |
|
Diary |
Allows the referrer to view tasks marked as Public and add, if relevant permission given, tasks. |
The following new parameters have appeared in the System Parameter list:
Create Client Workflow
Create Matter Workflow
Is Workflow Integrated
Workflow Meta Data Service URL
Workflow Service URL
These items are included in preparation for future developments within ILB and should not be opened or amended.


 when the item is selected.