|
|
|
|
This section provides extended information on key features in 2.8.0. For more about these and other enhancements, please refer to the online Help.
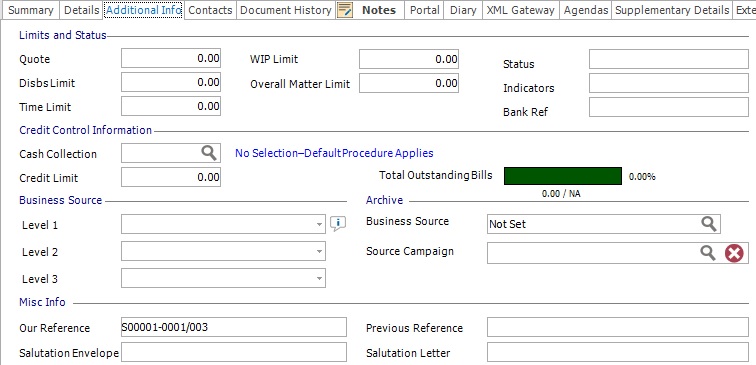
The Marketing tab in Client, Contact and Service Details and the Additional Info tab in Matter Details have been re-arranged and enhanced. The Business Source section has fields for levels 1 - 3. The old marketing fields can be found under the Archive section where they can continue to be used by the old marketing feature.
For those with the Microsoft Dynamics CRM integration , the Marketing tab now enables you to see where a client, contact or service has been contacted by the marketing team and view any campaign activity. This allows you to discuss the active and previous campaigns with the client, contact or service while you deal with their matters.
Fig. Marketing tab
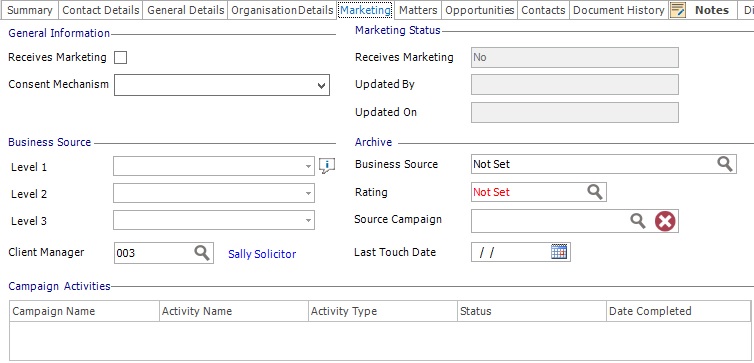
The Marketing Status fields are read-only fields, used for visual reference to assist in recording when consent was given or rescinded in line with GDPR. The Archive section holds the old marketing fields, which you can still use, if appropriate.
Fig. Additional Info tab
Consent Mechanism
To enable you to demonstrate compliance with GDPR, a new field, Consent Mechanism, has been added to the General Information section of the Marketing tab.
Fig. Marketing Consent Mechanism
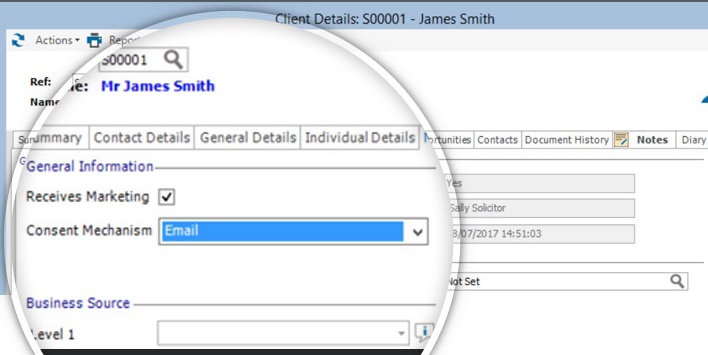
This new drop-down field enables you to select, from a predefined list, the method used to check that the contact or client is happy to receive marketing.
The drop-down list is maintained by the administrator and is located in Utilities » Firm Options » Marketing.
Fig. Marketing
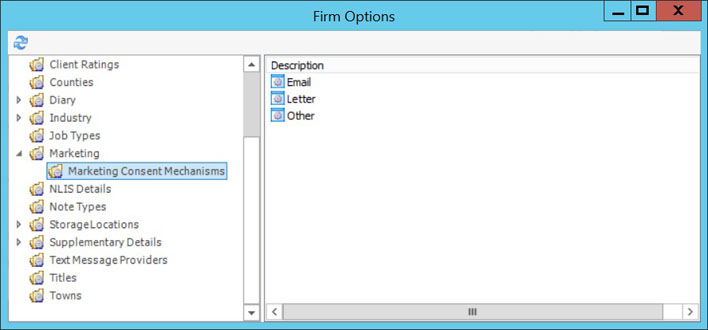
A new option, Marketing Consent Mechanism has been added in Utilities » Firm Options » Marketing » Marketing Consent Mechanisms. There are no standard entries added, so the list will be empty on upgrade.
To add a marketing consent mechanism:
New Business Source fields have been setup in Utilities » Modules » Marketing » Business Source. The new business sources form a tree structure with 3 levels. This enables you to group the sources, i.e. Referrers » Banks » List of banks. You can either build up the business sources manually or they can also be data pulled through from ALB or Microsoft Dynamics CRM in the case of marketing campaigns, services, contacts and fee earners.
Fig. Business source levels
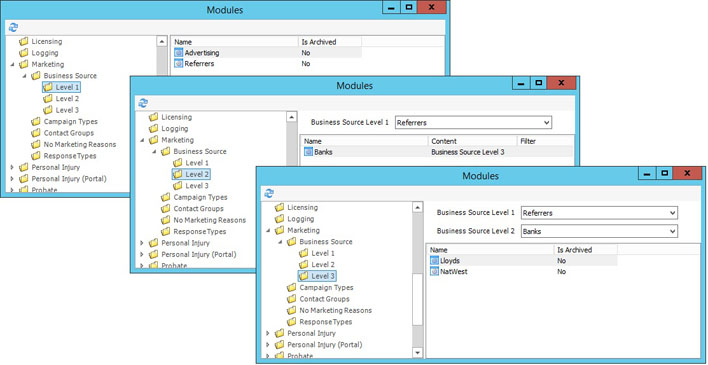
You have to add a business source for Level 1 before you can add one at Level 2 and a Level 2 source to add one at level 3.
Add Level 1 business source:
Fig. Level 1 business source

Add Level 2 business source:
Fig. Level 2 business source
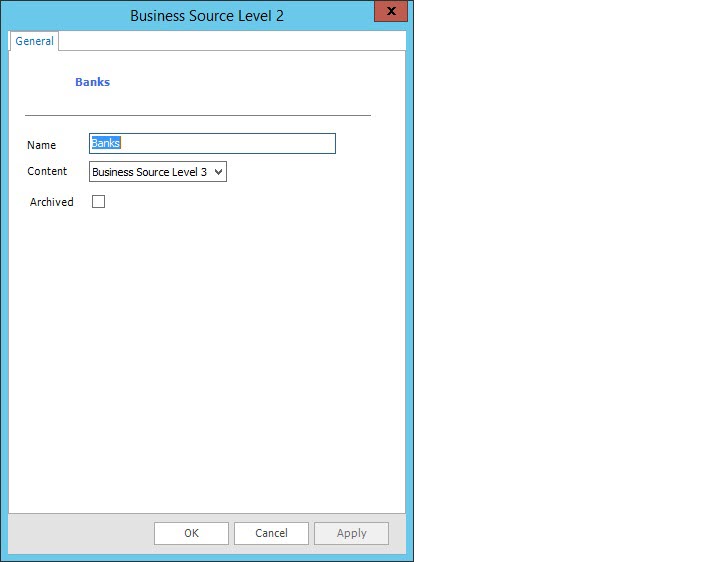
Fig. Level 3 business source

You can edit, archive and delete business sources as required by right-clicking the source and selecting from the short-cut menu.
Once the business sources have been setup in Utilities » Modules » Marketing, you can set them for client, contacts and services in the Marketing tab and the Additional Info tab for matters.
There is a new feature, Opportunities, which has been created for clients, contacts and services. The Opportunities tab enables you to view all opportunities for a specific client, contact or service. You can see what opportunities are open or have been closed with a client or contact when you are interacting with them. There is also a new dashboard element which lists all opportunities that have been assigned to you.
Opportunities can be added manually or can be generated by the Microsoft Dynamics CRM integration.
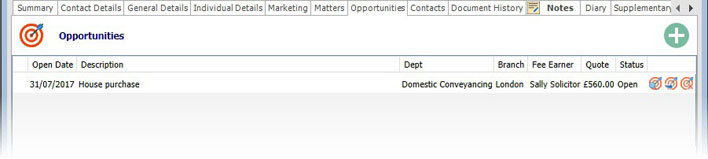
Fig. Opportunities
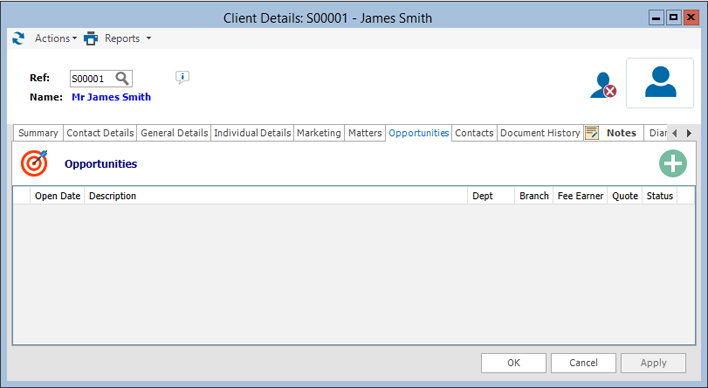
The grid displays a list of opportunities which includes the following data:
Once the opportunity has been added, you can edit and delete the item as required.
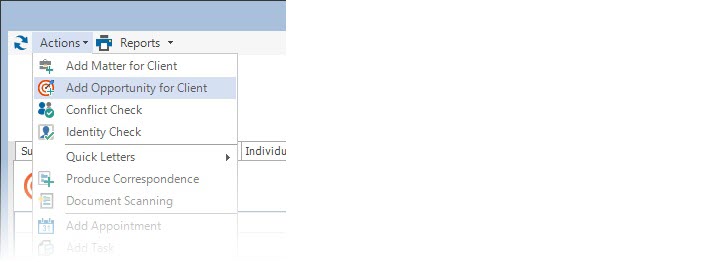
Add an opportunity
 icon or use the Actions menu
and select Add Opportunity for Client.
icon or use the Actions menu
and select Add Opportunity for Client.
Fig. Add Opportunity menu item
The Add Opportunity wizard displays.
Fig. Add Opportunity
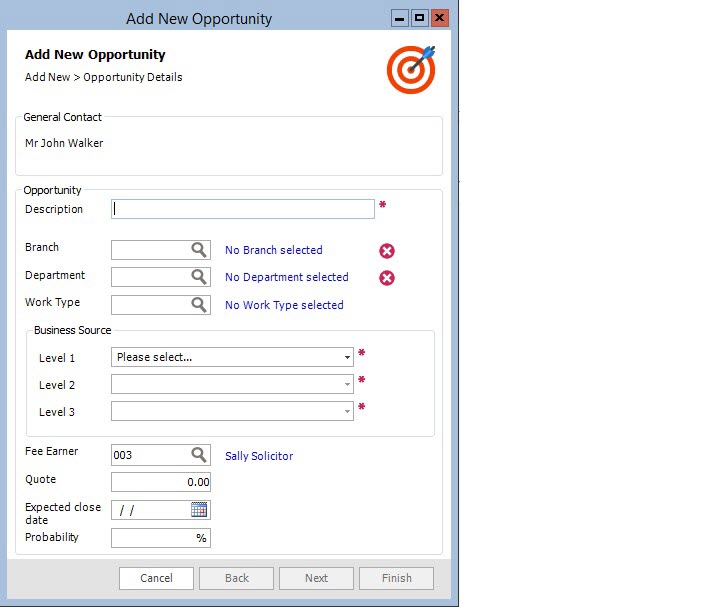
Fig. Opportunity Details
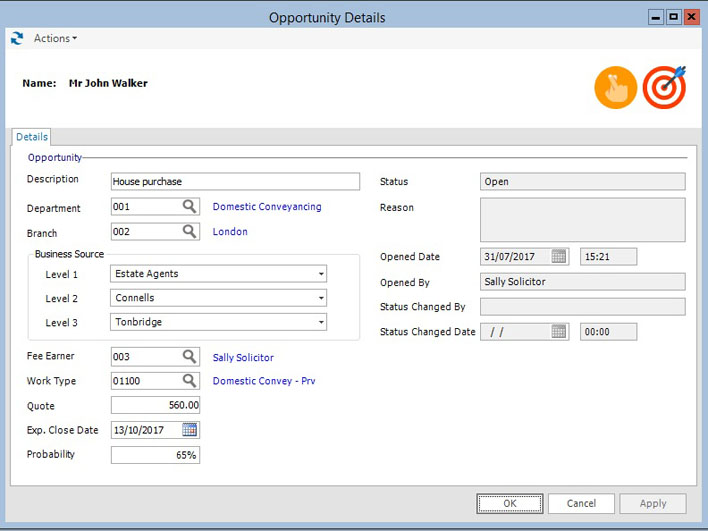
Fig. Opportunities
View, edit, convert and close opportunities
From the Opportunities tab in the client, contact or service details screens or the Open Opportunities dashboard element, you can use the three icons to the right of the grid to manage the opportunity.
These allow you to:
 View the opportunities details screen.
You can amend the details as required.
View the opportunities details screen.
You can amend the details as required.
 Upgrade the opportunity to a matter.
Where you have been successful, upgrade the opportunity. A dialog
box displays - enter a reason for the upgrade then click OK and the matter
wizard opens.
Upgrade the opportunity to a matter.
Where you have been successful, upgrade the opportunity. A dialog
box displays - enter a reason for the upgrade then click OK and the matter
wizard opens.
 Close the opportunity. Where you
have been unsuccessful, close the opportunity. A dialog box displays -
enter a reason for the closure then click OK.
Close the opportunity. Where you
have been unsuccessful, close the opportunity. A dialog box displays -
enter a reason for the closure then click OK.
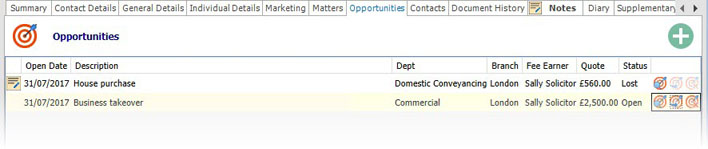
When you upgrade or close the opportunity, the status fields will update automatically. Back at the Opportunity Details screen, the upgrade and close icons will be greyed out but you will still be able to view the opportunity details. A notes icon will display to the left of the opportunity.
Fig. Opportunities
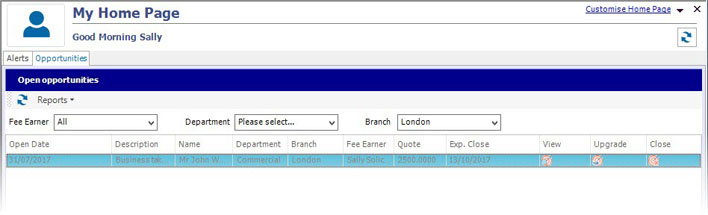
Open Opportunities dashboard element
A new dashboard element has been added which enables you to view opportunities that have been assigned to you. This element also enables you to add and manage the opportunities as well as export the data to Excel via the Reports option. Filters for fee earner, department and branch are available to make easy the location of required opportunities.
Fig. Open Opportunities element
The Client Portal has been improved so that it can display milestones and public documents for any matter via the PMS Matter Details screen as well as the Debts and Conveyancing starter packs and Conveyancing agenda module.
For those clients with the relevant permissions, when they log on to the client portal, they can select the type of case they wish to view:
Fig. Client Portal
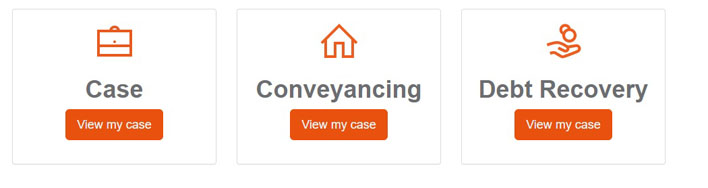
When the client selects the relevant case type, they will see a list of their matters with a link to view summary information, including milestones, and any documents that have had the Public check box selected. For further information, please see the Client Portal manual.
Unlike the starter packs and agenda modules which create and update the milestones as you run the workflows and processes, you need to create and update the milestones using the Portal tab in the Matter Details screen.
Fig. Portal tab
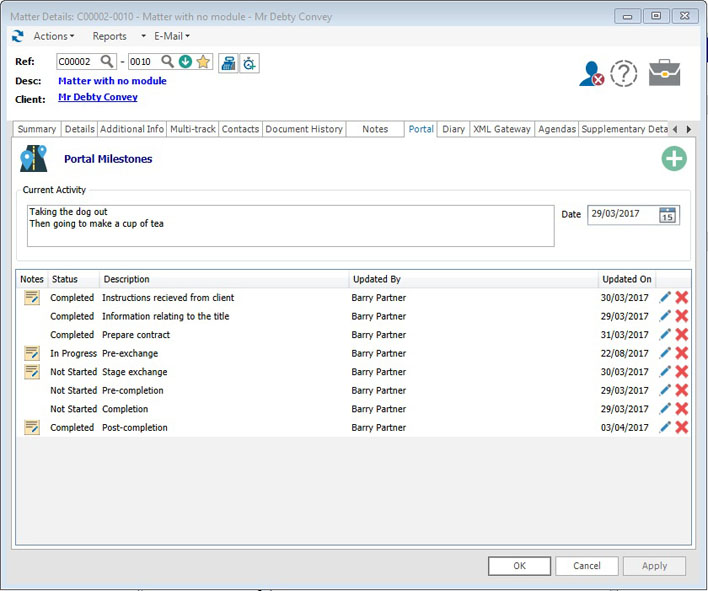
Using the Portal tab:
In the Matter Details screen, the new Portal tab enables you to set a status which displays in the client portal as a milestone. You can set the milestone status, enter a description and any relevant notes.
From the Portal tab, click on
the Add Portal Milestone icon to display the dialog
box.
Fig. Add Portal Milestone
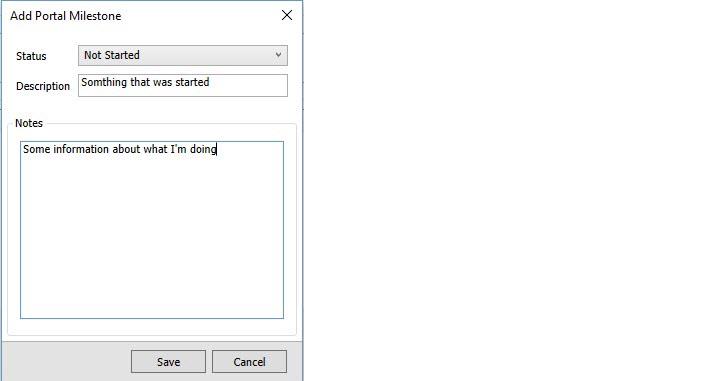
Use the drop-down to set the status. The options are:
Enter a description and any notes and click Save.
The milestones can be edited/updated
 or deleted
  at any time from the Portal tab.
To control access to the Client Portal and new Portal tab, new user features (Utilities » Licensing and User » System Users » Users » Staff) have been added in the PMS » Portal node:
Available Tasks
Viewing the processes available to run has been improved to ensure that you can have more control over workflow processes. A new screen, Available Tasks, has been created and is similar to the Task List dashboard element. It enables you to select which process to run next or pause all processes so you can move on to something else completely.
In Designer Studio, the Auto-Run process check box will determine if a matter will continue to automatically progress through additional tasks or present a list of available tasks to you so that the you can dictate the next course of action.
When there are outstanding tasks on the matter, that have not been set to Auto-run by the developer, you will be presented with the following screen detailing what tasks are available to run, along with a number of additional options.
Fig. Available Tasks
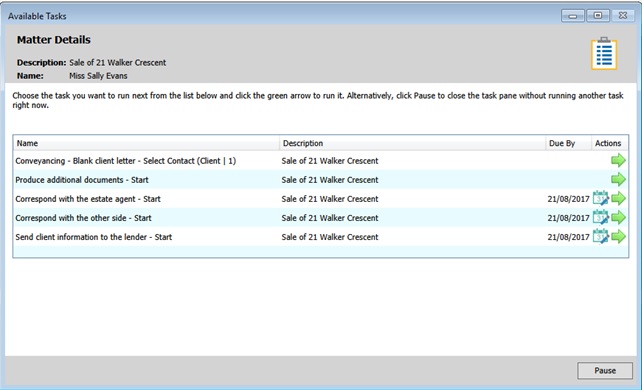
| Column | Description |
| Name | Name of the process that is available to run. The tasks will appear in date order by default, ensuring the oldest task it presented to the user first. |
| Description | Matter description. |
| Due by | Date the process is due to be run. Where available, you will be able to edit the date whereby the task becomes available. |
| Actions | You will be responsible for determining what task needs to be run, including their order. Click on the arrow to run the process. |
The Pause button, at the bottom right-hand corner, allows you to pause all processes and move on to work on something else entirely. On pressing Pause, you will be taken back to your Matter or Task List. All outstanding Tasks will then show in the User Task List.
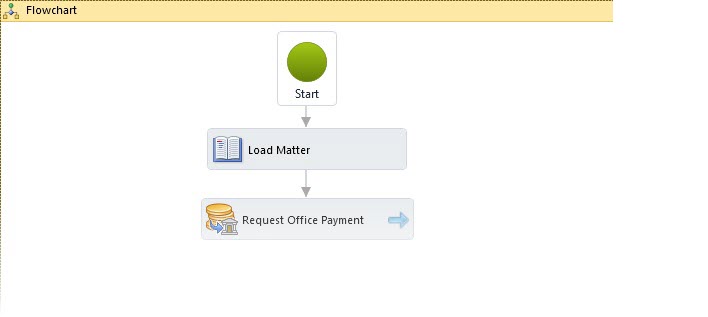
Request Office Payment activity
A new activity, Request Office Payment, has been added to enable you to create office payment requests as part of running a workflow. Further accounts request will be added in future releases.
Fig. Request Office Payment activity
To complete the required fields, click the right-hand arrow to display:
Fig. Expanded Request Office Payment
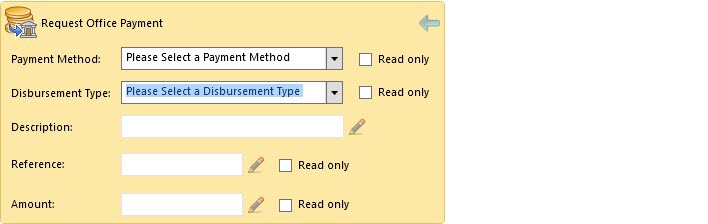
| Field | Description |
| Payment Method | Optional at design time. Drop-down to set the default payment method. Select the Read Only box to prevent the user from changing the selection at runtime. |
| Disbursement Type | Optional at design time. Drop-down to set the default disbursement type. Select the Read Only box to prevent the user from changing the selection at runtime. |
| Description | This is set dependent on the disbursement type selected. However, it is possible for you to override this by using a formula via the Edit tool. |
| Reference | Optional at design time. Click on the Edit tool to add the contents via the formula. Select the Read Only box to prevent the runtime user from changing the selection. |
| Amount | Optional at design time. Click on the Edit tool to add the formula. It is possible to assign values to UD Fields (e.g. Estate Agents Fees) and also access look up tables (e.g. Land Registration Fees). Select the Read Only box to prevent the runtime user from changing the selection. |
DateDifYears function
A new function has been added to the formula building wizard in Designer Studio to enable you to calculate ages, durations etc.
Fig DateDifYear function
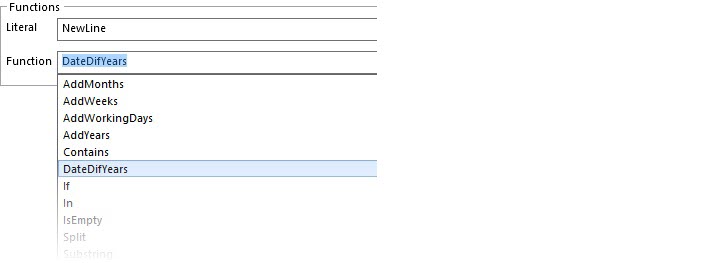
The new DateDifYear function has the following syntax:
Fig. DateDifYears syntax

The start and end dates can be set dates or date fields.
Fig. Formulae examples

Generate Hub Form workflow activity
The new workflow activity, Generate Hub Form, is available to be dragged from the activity list to the workflow to enable you to generate forms using Laserform Hub.
To create a Generate Hub Form in a workflow:
Open Designer Studio and Conveyancing. Expand Workflow and Matter and open the relevant Worfklow. Drag the Generate Hub Form activity to the relevant place in the workflow.
Fig. Generate Hub Form activity
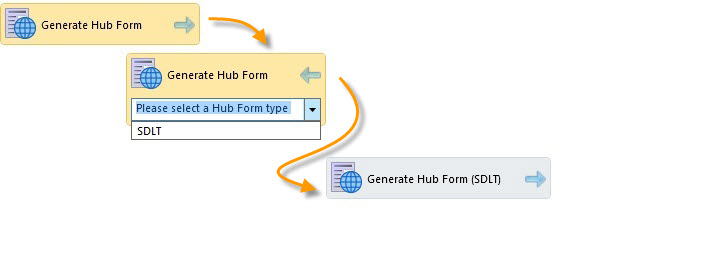
Use the drop-down to select the SDLT form and then click the left-hand arrow to collapse the activity. Save the workflow.
Merging to Laserform Hub
Running the workflow opens Laserform Hub and merges data held in ALB to the relevant fields, including the following sections of the SDLT form:
However, you will need to check through the form and complete any blank fields.
Fig. Laserform Hub
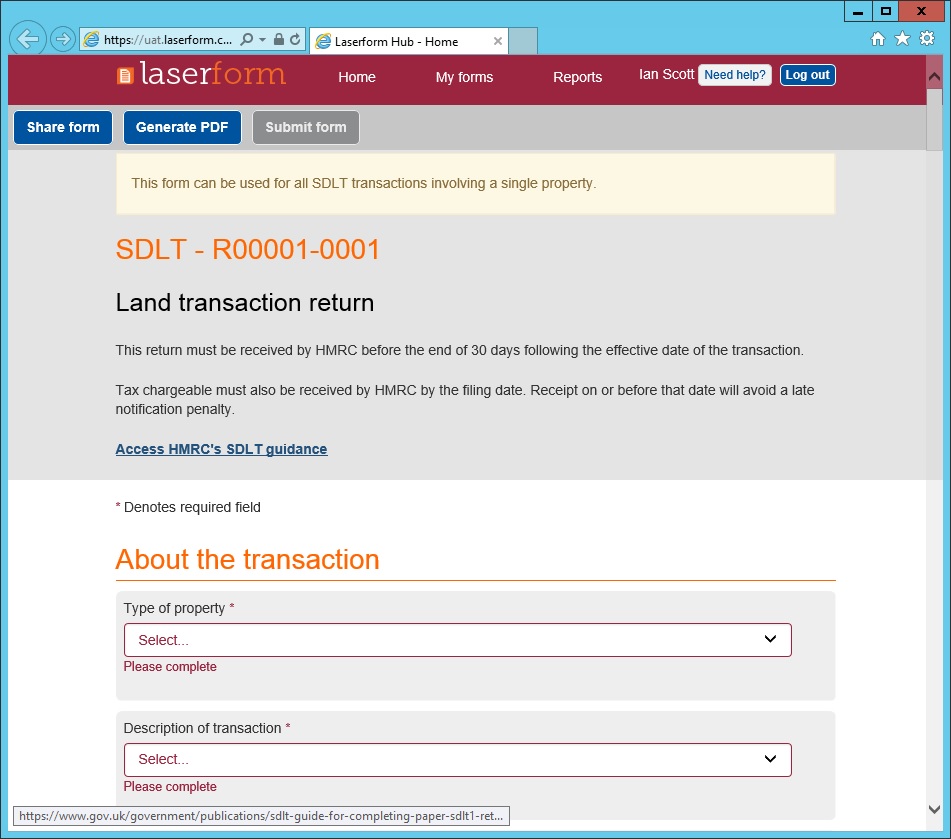
When the fields in the form have been completed, click Submit form.
Once the SDLT has been submitted, you will receive an email which contains a link to the SDLT5.
The SDLT5 is the certificate you get confirming the submission. This gives details of the status of the submission (e.g. draft, submitted) and the date and time of submission. The SDLT5 is also sent to the Land Registry along with the AP1.
Click the link to display the SDLT5; this can be saved into the history to prove that the tax return has been made. You can also save the email you automatically receive into the history.
As well as merging to Laserform Hub by running a workflow, you can merge a Laserform Hub form from the Actions menu.
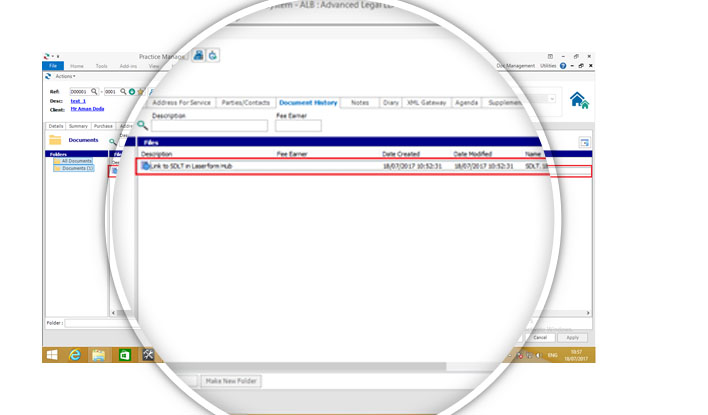
Laserform Hub link in document history
A link to a saved Hub form is saved to the history for easy access. When a form is created via ALB, the Hub creates a form and responds with the form ID. This form ID is then embedded in the URL associated with that submission. This link is saved to the matter history as a hyperlink so you can easily access the form in the Hub at any point in the future. The right click options usually associated with a document in document history are disabled and it does not display anything in the preview pane.
Fig. Hub link
Add-ins ribbion
Work has been completed on making access to add-ins more user-friendly, including the Laserform Hub, OverVu reporting and BigHand digital dictation:
A new section has been created on the Tools ribbon for Add-ins.
Fig. Add-in section
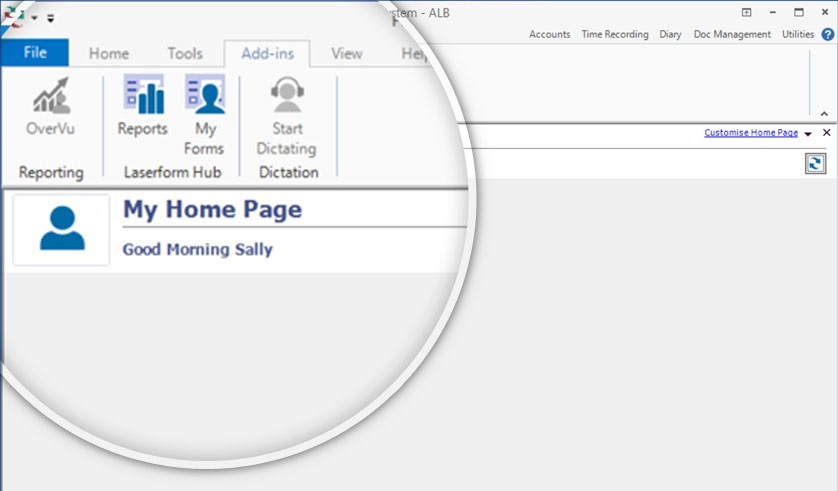
This has new buttons to launch OverVu reporting, the Laserform Hub for Reports and My Forms and BigHand digital dictation. The tools will only be active if you have the relevant add-in installed.
To improve the user experience, a new feature has been added to assist with the drafting of attendance notes.
Fig. Ribbon Add Attendance Note

Fig. Matter details Add Attendance Note
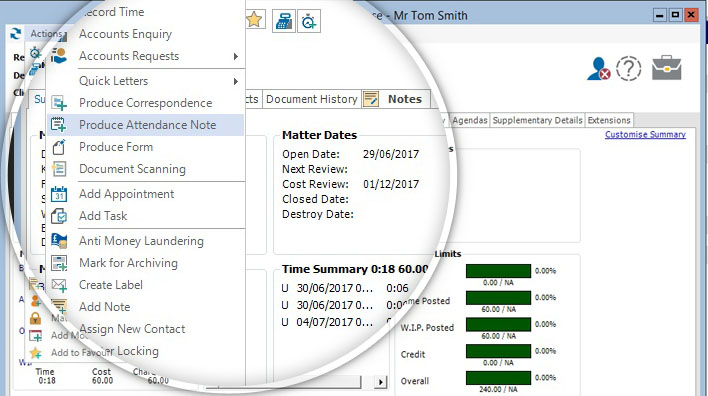
Both options display the Add Attendance Note dialog box which enables you to create an attendance note and automatically starts the timer, if the user feature, Automatically Start Timer, is selected. The dialog box has two tabs to complete the matter and attendance note details and the time recording details:
Fig. Attendance Note tab
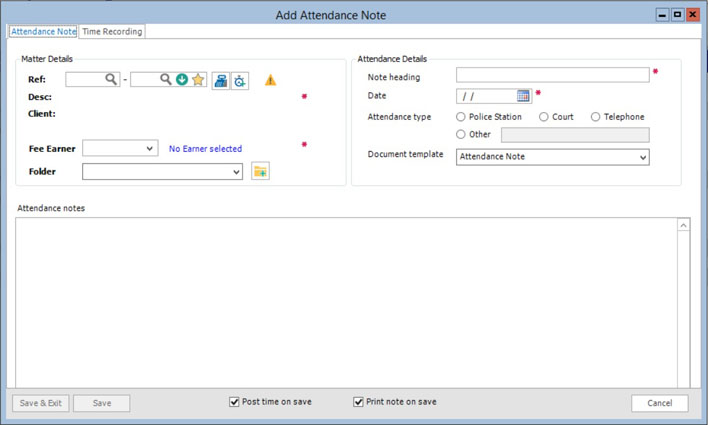
| Field | Description |
Matter Details |
|
| Ref | Completed automatically if launched from a matter. If not,
use the following to search for the client and matter:
 Lookup to search for the
client and matter. Lookup to search for the
client and matter.
 Matters to select from a
list of matters belonging to the selected client. Matters to select from a
list of matters belonging to the selected client.
 Favourite to select from
the favourites tab or recently used tab. Favourite to select from
the favourites tab or recently used tab. |
| Fee Earner | Defaults to the matter fee earner, or logged in fee earner. You can use the drop-down to select a different fee earner. |
| Folder | Use the drop-down to select the folder to save the note to
in document history. If none selected, it will be saved
according to the system parameter.
For a new folder, type a suitable folder name in the field and click the New folder tool  . . |
Attendance Details |
|
| Note heading | Enter a suitable heading for the note. |
| Date | Enter or use the date lookup to select a date. |
| Attendance type | Use the radio buttons to select the relevant attendance note type. If selecting Other, enter the type details in the adjacent field. |
| Document template | Use the drop-down to select the required attendance note template.
Once selected, this is retained as a user preference. |
Attendance Notes |
|
| Type required notes. | |
Fig. Time Recording

| Field | Details |
Timer |
|
| Use the timer, which starts running automatically when you click the Add Attendance Note tool, if the user feature, Automatically Start Timer, is selected. You can switch to Input mode and enter the start and stop or during details. See Working with Timers for full details. | |
Time Details |
|
| Complete the time details as required. See Time Entry Details for full details of the fields. | |
| Add | Click to add the time entry to be able to add another time entry. |
| Cancel (displays when you edit a time entry) | Cancel any amendments. |
| Update (displays when you edit a time entry) | Update the time entry with any amendments. |
Time Grid |
|
| When you click Add, the time details are displayed in the grid and the timer is reset to zero ready to record the next time entry. | |
|
Edit the time entry. The details display in the Time Details section for you to amend. |
 |
Delete the time entry. |
At the bottom of the dialog box the following buttons and check boxes enable you to select how to save the attendance note and time:
When recording time, two new fields, Attendance Note and Doc template have been added to the Time Recording dialog box to enable you to select an attendance note template to merge and save it or open it for further editing.
Fig. Time Recording
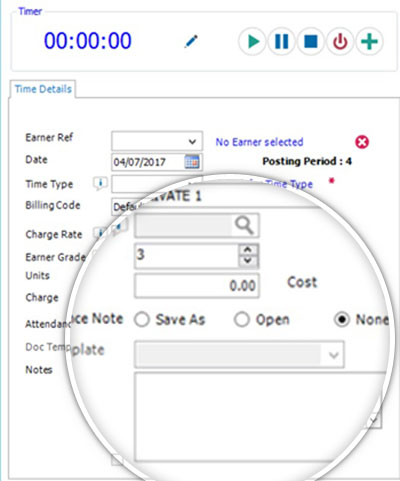
The Attendance Note field allows you to merge an attendance note with the time entry:
The Doc Template drop-down list displays templates flagged as attendance note. This field is only active when Save as or Open has been selected from the above Attendance Note option.
The Accounts Requests process has been enhanced to improve the user experience. This includes:
Accounts Requests menu
A new menu command, Accounts Requests, has been added to the Matter Details » Actions menu. The menu displays a side option with a choice of Bill, Client and Office requests, plus, if you have the relevant permission, Authorise Accounts Requests. The Client and Office request menus have further sub-menus to enable you to deal with payments and receipts.
Fig. Accounts Requests

Using the new menu saves time and keystrokes, opening the relevant request dialog box without having to go via the Accounts Enquiry screen and completing the active client/matter details manually. The new request dialog boxes have also been enhanced to provide a consistent feel with relevant defaults set and fields for bank information depending on the request type selected.
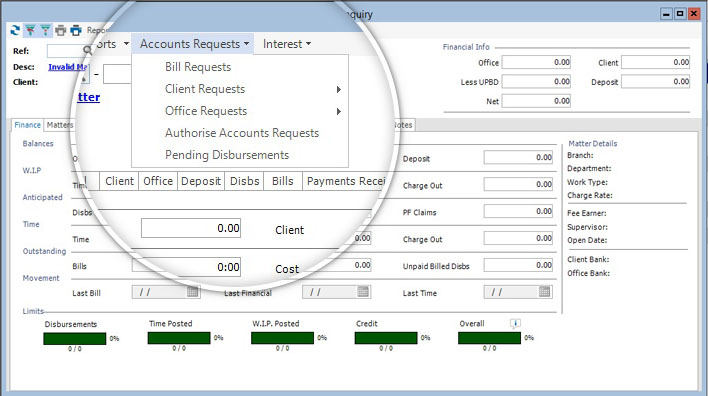
Accounts Enquiry
To remain consistent, the Accounts Requests menu in Accounts Enquiry has also been amended to the new layout, but with the addition of Pending Disbursements.
Fig. Accounts Enquiry
Editing an accounts request
Once a request has been raised, it is possible to edit the request so that any errors can be corrected provided the request has not been authorised.
To edit an accounts request:
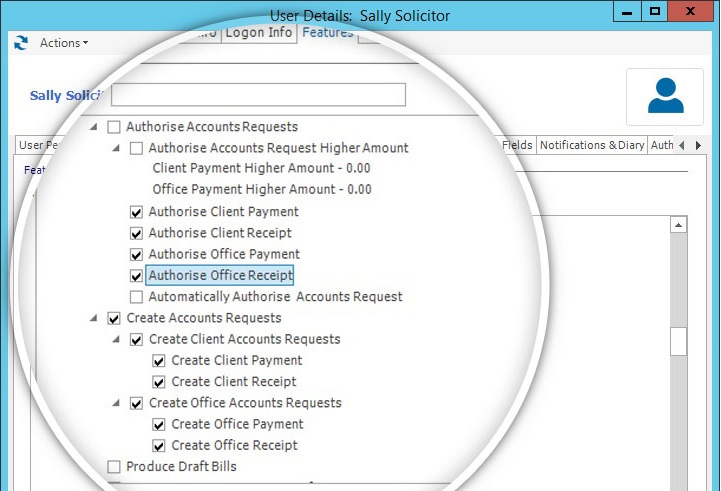
Accounts Request user features
Administrators can give permissions to create and authorise accounts requests via user features. These have been updated to tie-in with the new request menus. They have also been grouped more logically, all under one node called Accounts Requests.
To set the Accounts Requests features:
Fig. User features
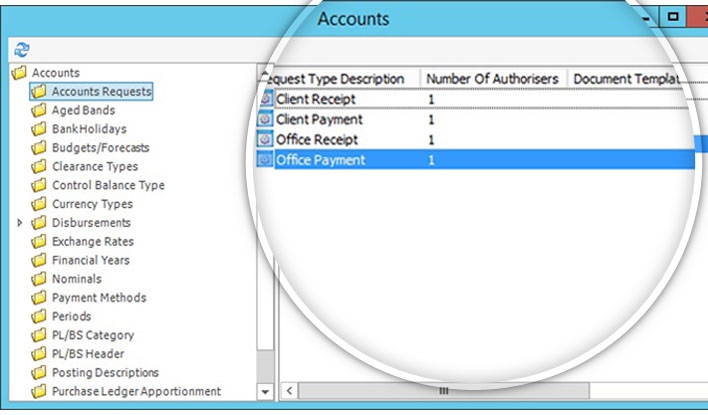
Accounts Requests
As part of the enhanced accounts requests authorisation process, a new folder, Accounts Requests, has been created in Utilities » Accounts. This enables administrators to set the number of authorisers required for each accounts request type and also the document template to be used when the user clicks Print when raising an accounts request. The generated document is subsequently saved to the matter history.
Where multiple authorisations are required, the user that submitted the request will only receive notification of the authorisation and submission to accounts once all the required authorisations have been confirmed. They will not receive one each time one of the authorisations has occurred.
Fig. Accounts Requests Type
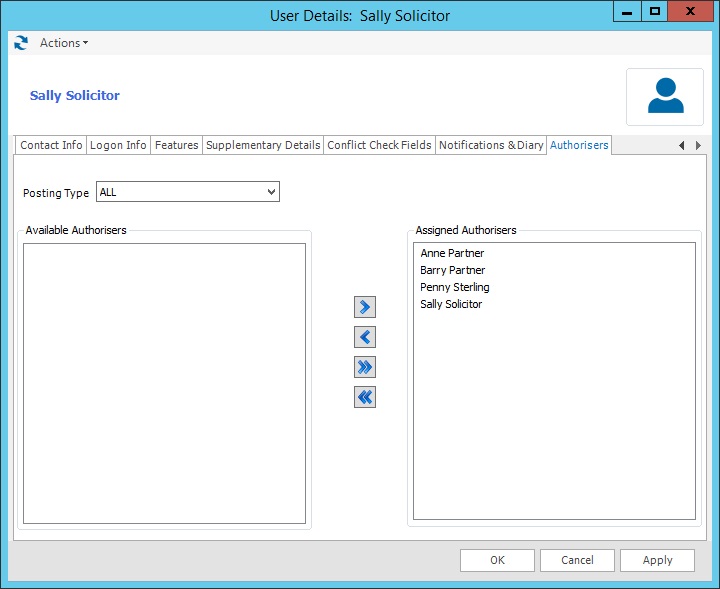
Accounts Requests authorisers
Administrators can specify which authorisers can approve accounts requests for each user via a new tab, Authorisers, in the Staff details. Authorisers will only see requests from users they have been assigned to when they go to Accounts Enquiry » Authorise Accounts Requests.
To set authorisers:
Fig. Authorisers
Notifications
The user feature, Receive Accounts Request Notification (previously Receive Cheque Request Notification), has been amended in light of the changes to named authorisers. When the feature is selected, the authoriser will only receive notifications for requests from users where they are an assigned authoriser for that type of request.
Transfer Authorisation rights
When an authoriser leaves the firm, it is possible to transfer their permissions to another authoriser.
To transfer authorisation permissions:
Fig. Transfer Authorisation
![]()
Authorising Accounts Requests
When authorisers open the Authorise Accounts Requests, only those requests from users where they are set as authorisers will be displayed. However, there is a check box in the bottom right-hand corner, Show All Users' Requests, which can be selected to display requests from all users. Once a user has authorised a request it no longer displays on their grid. Where a request requires multiple authorisations, it will continue to display on the remaining assigned authorisers until the set number of authorisations have been given.
A request will only be submitted to accounts once the required number of authorisations have been given.
There are two new columns on the right-hand side of the grid to cover the new authorisation process:
The labels on the left-hand side of the dialog box have been amended to be consistent with the new Action menu items.
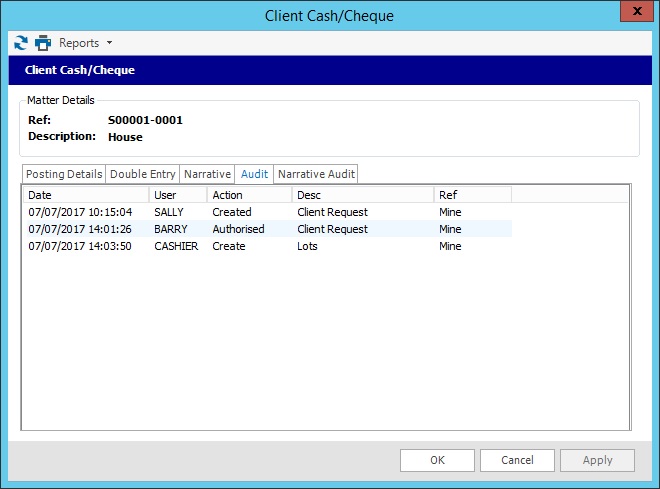
At the end of the process, when the request has been authorised and posted, you can view the audit trail by double-clicking on the entry in the ledger and selecting the Audit tab.
Fig. Audit tab
The Client and Matter Locking process has been amended. It is now called Client and Matter Permissions as the process is to give users permissions and lock others out of the record. The process has been changed to make the it more flexible and easier to use. It also removes the risk of no users having permissions to access the client or matter.
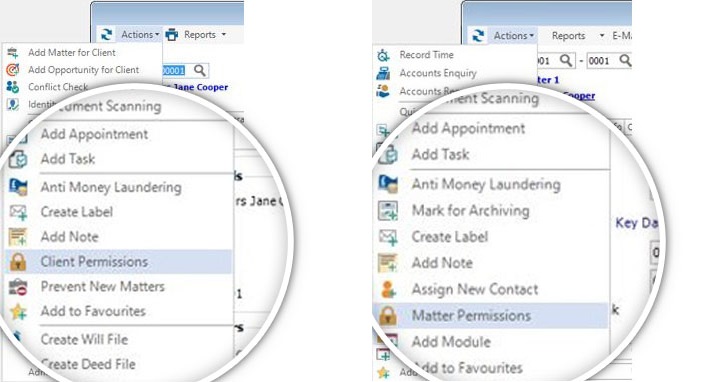
The process has been renamed from Locking to Permissions, so the menu items to restrict access to a client or matter are in the Actions menu and are now called Client Permissions and Matter Permissions.
Fig. Permission menus
Selecting either menu option displays the Client or Matter Permissions dialog box.
You can give permissions to access the client or matter record by selecting the radio set :
If no users or groups are selected, the client or matter record is available to all users. If you have restricted access to a client or matter, you can open it up to all users by removing all users or groups in the permissions dialog box.
Fig. Individual Permissions
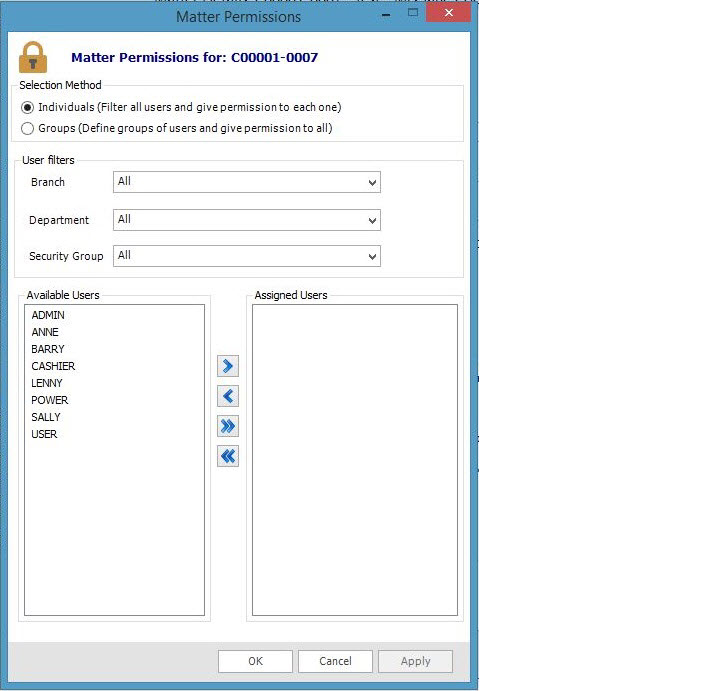
User filters
You do not need to use the filters, but using them will reduce the number of users in the available column and make it easier to locate and assign the users.
The filters of Branch, Department and Security Group are drop downs which enable you to filter the contents of the Available users column.
Available\Assigned users
The list of users in the Available column will depend on the filters above. Use the arrow heads to move users between the columns. When you have the required users in the Assigned user column, click OK.
Fig. Group Permissions
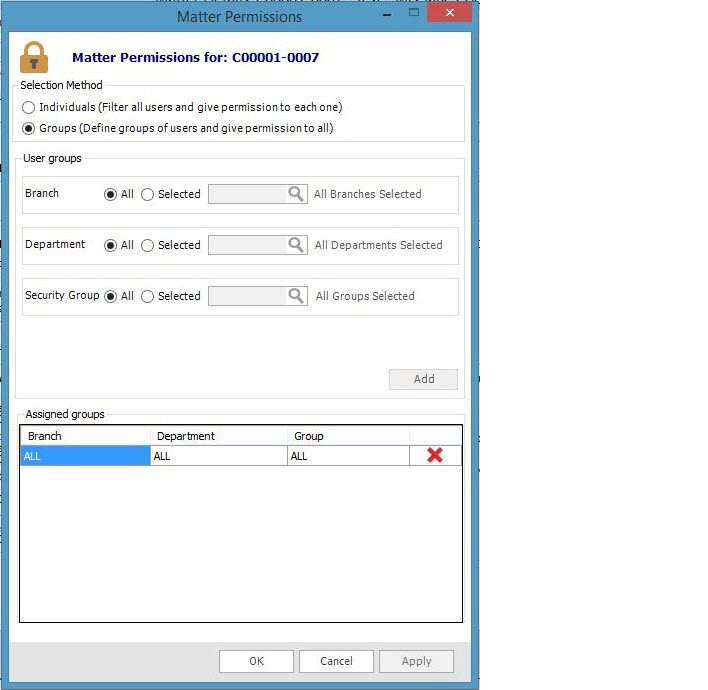
Group filters
The Branch, Department and Security groups can be used to set the group of users that require access. If the group is by department, e.g. Conveyancing, when a user transfers from Conveyancing to another, their permissions are automatically rescinded.
To filter, click the Selected radio button and use the lookup to choose the required item.
Once you have set the relevant groups, click Add to place the filter in the Assigned groups.
Click OK.
To remove an assigned group,
click the Delete icon adjacent to the group.
The ability to add or remove users from access to clients and matters is now achieved by new user features, Manage Client Permissions and Manager Matter Permissions (Utilities » Licensing and Users » System Users » Users » Staff) in the PMS » Clients and Matters nodes. Users with the permissions can assign individuals or groups to have access a client or matter.
|
© Advanced, Oct 2017 • Terms of use • Contact us |
|